How to set up a pptp connection on windows 7. PPTP connection - what is it? Is it worth using third-party utilities?
- Step 1. Click the network icon on the taskbar and open Network and Sharing Center.
 Step 2. Select Setting up a new connection or network.
 Step 3. Select Connection to the workplace And create a new connection(if a new window appears) and click Further.
 Step 4. Select Use my Internet connection (VPN).
 Step 5. Enter Hostname(from PPTP text file in user panel) as Internet addresses and give the connection a name in the field Destination name. Specify Don't connect now and click Further.
 Step 6. Enter authorization information (from the PPTP text file in the user panel). Specify Remember this password and click Create. Close next window.
 Step 7 Click the network icon on the taskbar. Right-click on the connection you just created and log in Properties.
 Step 8 Select a tab Safety and change the VPN type to Point-to-Point Tunnel Protocol (PPTP) and data encryption on The most persistent. Click the button OK.
 Step 9 VPN connection is ready. Now click on the network icon on the taskbar, select your new VPN connection and click Connection.
 Step 10 Click Connection.NB! Never use the save password feature on public computers! If anyone connects using the saved data, your connection will be disconnected!
 Step 11 Click the network icon on the taskbar and click Shutdown to break the connection.
 Step 12 If you see a window Network location settings, select Community Network.
Removing a VPN connection

One of the frequently asked questions by our users is how to add a different IP address to their server. You can assign your private IP address to your droplet by creating a VPN tunnel. There are several options for building your own virtual private network (VPN) or assigning an SSL certificate to this IP address. Of all the possible options, the best choice is between PPTP and OpenVPN. Point-To-Point Tunneling Protocol (PPTP) allows you to get your VPN up and running very quickly and is compatible with most mobile devices. And while PPTP is less secure than OpenVPN, it is faster and uses less CPU power.
Step 1 - Install PPTP
You need to select one server that will be responsible for distributing IP addresses to other servers and authorizing all your servers in your VPN. It will become your PPTP server.
On CentOS 6 x64:
Rpm -i http://poptop.sourceforge.net/yum/stable/rhel6/pptp-release-current.noarch.rpm yum -y install pptpd
On Ubuntu 12.10 x64:
Apt-get install pptpd
Now you need to edit the /etc/pptpd.conf file by adding the following lines to it:
Localip 10.0.0.1 remoteip 10.0.0.100-200
In this case, localip is the IP address of your server, and remoteip is the IP addresses that will be assigned to clients that connect to it.
Here client is the user name (login), server is the type of service (in our example - pptpd), secret is the password, and IP addresses indicates which IP addresses can log in (with this login and password). By setting an asterisk * in the IP addresses field, you indicate that this login/password pair should be accepted from any IP.
Step 2 - Adding DNS Servers to /etc/ppp/pptpd-options
ms-dns 8.8.8.8 ms-dns 8.8.4.4Now you can start the PPTP daemon:
Service pptpd restart
Check that it is running and accepting connections:
Step 3 - Setting up Forwarding
It is very important to enable IP forwarding on your PPTP server. This will allow you to forward packets between the public IP and private IPs that you have configured using PPTP. Just edit /etc/sysctl.conf to add the following line if it wasn't already there:
Net.ipv4.ip_forward = 1
To apply the changes, run the command sysctl -p
Step 4 - Create NAT rules for iptables
iptables -t nat -A POSTROUTING -o eth0 -j MASQUERADE && iptables-saveIf you also want your PPTP clients to be able to communicate with each other, add the following rules for iptables:
Iptables --table nat --append POSTROUTING --out-interface ppp0 -j MASQUERADE iptables -I INPUT -s 10.0.0.0/8 -i ppp0 -j ACCEPT iptables --append FORWARD --in-interface eth0 -j ACCEPT
Now your PPTP server also works as a router.
If you want to set a limit on which servers can connect to your droplets, you can set an IP table rule that restricts TCP connections to port 1723.
Step 5 - Setting Up Clients
Install the PPTP client on your client servers:
Yum -y install pptp
Step 6 - Adding the Required Kernel Module
modprobe ppp_mppeCreate a new file /etc/ppp/peers/pptpserver and add the following lines there, replacing the name and password with your values:
Pty "pptp 198.211.104.17 --nolaunchpppd" name box1 password 24oiunOi24 remotename PPTP require-mppe-128
Here 198.211.104.17 is the public IP address of our PPTP server, box1 and 24oiunOi24 are the login/password pair that we set in the /etc/ppp/chap-secrets file on our PPTP server.
Now we can "call" this PPTP server. In the next command you need to use the name that you gave to the peer file in the /etc/ppp/peers/ directory. Since we named this file pptpserver in our example, our command looks like this:
Pppd call pptpserver
You should see a successful connection in the PPTP server logs:
On your PPTP client, configure routing to your private network via the ppp0 interface:
IP route add 10.0.0.0/8 dev ppp0
Your ppp0 interface should be configured, which can be verified by running ifconfig
Now you can ping your PPTP server and any other clients connected to this network:
We can add a second PPTP client to this network:
Yum -y install pptp modprobe ppp_mppe
Add the necessary lines to the /etc/ppp/peers/pptpserver file (replacing logins and passwords with your own):
Pty "pptp 198.211.104.17 --nolaunchpppd" name box2 password 239Aok24ma remotename PPTP require-mppe-128
Now on the second client run the following commands:
Pppd call pptpserver ip route add 10.0.0.0/8 dev ppp0
You can ping the first client, and the packets will go through the PPTP server and be redirected according to the rules of the IP tables that we set earlier:
This setup will allow you to create your own virtual private network:
If you want all your devices to communicate securely on the same network, this is the fastest way to do it.
You can use this approach with Nginx, Squid, MySQL and any other applications.
Because traffic within the network is encrypted with 128-bit encryption, PPTP is less CPU intensive than OpenVPN, but still provides an additional layer of security for your traffic.
In this article we will look at setting PPTP-VPN servers in Ubuntu. A VPN server is a very useful thing in the household, providing a secure, encrypted connection to a local network (for example, a home network) of remote computers, smartphones and similar devices. For example, your VPN server will allow you to:
- Ensure the confidentiality of transmitted and received data when you (your laptop, smartphone) are on an untrusted network and there is a threat from this network.
- It is safe to manage the server through, because the password for screen sharing is usually transmitted in clear text (the exception is remote desktop in Mac OS X and managing it using Apple Remote Desktop), which is why it is completely unacceptable to connect to the desktop directly via the Internet .
- The same can be said if you use classic FTP to transfer files - the protocol also does not provide a secure authentication mechanism, which is why they try to use SFTP whenever possible.
- It is safe to exchange data both with the server and with the computers that make up your local (home) network (provided there is no HPVC attack, Hackers Right in the Apartment).
Generally speaking, a VPN will provide you with an encrypted virtual tunnel between a server and a remote machine, with all the ensuing consequences. If you imagine the Internet as a pipe, then the VPN creates a smaller diameter pipe inside it, accessible only to “its people.”
Now that we have looked at the overall benefits of VPN, it’s time to get acquainted with the technology in more detail and understand what types of VPNs exist.
Today there are several VPN implementations:
After that, edit the /etc/pptpd.conf file by running in the Terminal:
sudo pico /etc/pptpd.conf
This is what the file looks like for me:
Then in the /etc/ppp/chap-secrets file we add users who will have the right to connect to the VPN network. Type in the Terminal:
sudo pico /etc/ppp/chap-secrets
And add information to this file in the following form:
# Secrets for authentication using CHAP
# client server secret IP addresses
andrey pptpd andrey12 *
Thus, we have given the user andrey with the password andrey12 the right to connect to our VPN network. The user andrey will be given the first available IP address from the specified range. If you want the user to always be given the same IP address, specify the desired IP instead of “*”. Pay attention to the name of the service - pptpd - it must be the same as specified in the name parameter in the /etc/ppp/pptpd-options file.
We are done with the VPN server settings; now we need to restart it for the changes we made to take effect. To do this, run in the Terminal:
sudo /etc/init.d/pptpd restart
If it is necessary for connected remote clients to have access to the Internet via VPN, open /etc/rc.local and ABOVE ‘exit 0’ add the following lines:
# PPTP IP forwarding
iptables -t nat -A POSTROUTING -o eth0 -j MASQUERADE
and uncomment this line in the /etc/sysctl.conf file:
net.ipv4.ip_forward=1
If your VPN server is not directly connected to the Internet, you will most likely need to forward the TCP-1723 port and “protocol 47”, also known as GRE, to the local IP address of the VPN server. Refer to the router setup instructions to complete the necessary steps. Obviously, the server behind the router must have a permanent local IP, and the router itself must have a permanent “external” IP, or you will have to use the “dynamic DNS” service, but this is a completely different topic.
Reboot the server. You can try to connect. Your VPN should be accessible from anywhere in the world where there is internet.
Connecting a client with Mac OS X 10.6
To connect to a VPN with Mac OS X 10.6, open “System Preferences”, go to the “Network” section, under the list of interfaces, click “+” at the bottom and in the interface adding window that appears, select “Interface: VPN”, “VPN Type: PPTP” . And click create. In the settings, specify:
- VPN server domain name, or IP address
- Account name (login)
- Encoding (channel encryption) – select “Maximum (128 bits only)”
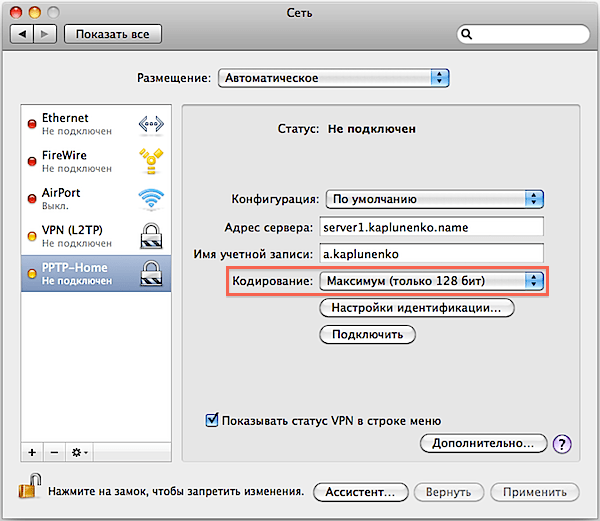
Then click “Identification Settings”, indicate that identification is carried out using a password and enter the password.
Click "Advanced" and check or uncheck the "Send all traffic through VPN" checkbox. If the checkbox is checked, then absolutely all traffic will pass through the VPN server and be delivered to you over an encrypted channel. If the checkbox is unchecked, then only traffic destined for the remote local network will pass through the VPN channel (for example, you can manage the server via Remote Desktop), and all other traffic, such as receiving mail and loading web pages, will be carried out directly from the Internet along the shortest route. Confirm the changes by clicking "OK".

Now you can try to connect by clicking “Connect” (see 1st screenshot), or by selecting the desired VPN connection in the menu bar at the top.
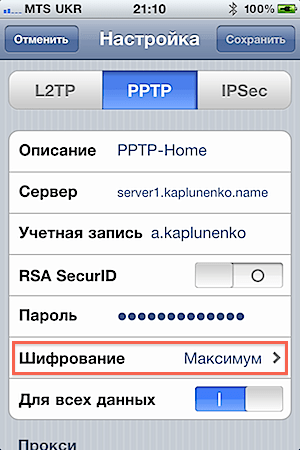
Connecting iPhone with iOS 4
To connect an iPhone running iOS 4 to a PPTP VPN, open Settings, go to the “General” section, then “Network”. Click the “VPN” item; if you do not have VPN configurations, it will say “Not configured” next to it. Click "Add VPN Configuration...". In the window that opens, go to the PPTP tab and fill in:
- Description – what this VPN connection will be called
- Server – domain name or IP address
- Account – your login
- RSA SecurID – leave it disabled
- Password – enter your password
- Encryption – select “Maximum”
- For all data – either turn it on or off, guided by the considerations described above

Connection diagnostics
PPTP usually starts up without problems, and with careful initial setup it works immediately (unlike the more complex L2TP-over-IPSec). And if you still experience connection problems, use the following commands on the client (in this case, Mac OS X) to monitor the connection log in real time:
tail -f /var/log/system.log
tail -f /var/log/ppp.log
You should see something like this there:
May 2 21:44:59 ATT pppd: PPTP connecting to server "server1..456.789.10)…
May 2 21:45:02 ATT pppd: PPTP connection established.
May 2 21:45:02 ATT pppd: Connect: ppp0<-->socket
May 2 21:45:08 ATT pppd: MPPE 128-bit stateless compression enabled
May 2 21:45:09 ATT pppd: local IP address 192.168.18.2
May 2 21:45:09 ATT pppd: remote IP address 192.168.18.1
May 2 21:45:09 ATT pppd: primary DNS address 10.0.0.1
May 2 21:45:09 ATT pppd: secondary DNS address 10.0.0.1
If you need to enable detailed logging on the server, refer to the already mentioned reference “Description of options /etc/pptpd.conf and /etc/ppp/options.pptpd”.
“Cryptanalysis of the point-to-point tunnel protocol (PPTP) from Microsoft” - The article is quite old, for example, no one has been using the MS-CHAP mechanism for a long time (after all, there is MS-CHAP v.2, much more reliable, although also very far from ideal ), but allows you to get an impression of the general scheme of how PPTP works. Also, it will be clear why there is no point in improving and finalizing PPTP, but instead it is better to consider alternative, more modern options.
“Cryptanalysis of Microsoft’s PPTP Authentication Extensions (MS-CHAPv2)” – The second article in continuation of the one mentioned above (there is no translation, so we read in Shakespeare’s language), which discusses improved PPTP with MS-CHAP v2 authentication and improved MPPE (channel encryption). It was on this option that the development of PPTP stopped. Summary of the article - MS-CHAP v2 is better than MS-CHAP v1, because not only the client is authorized, but the client and server authorize each other, which eliminates the substitution of the server. MPPE channel encryption now uses a different key to encrypt data from server to client and from client to server. The obvious security flaws have been eliminated, and the main criticism of PPTP now is that the protocol remains password-sensitive, that is, it is only as secure as the password chosen by the user.
" " - For those who have already figured out PPTP, I suggest you familiarize yourself with the more advanced VPN technology - L2TP/IPSec. The article was completed and edited over the course of 3 years; many nuances were considered.
Summary
PPTP is the easiest VPN service to set up, but it does not meet modern security requirements. In addition to this, PPTP is often blocked by providers and mobile operators. Therefore, the implementation of PPTP for corporate use is justified only if it is necessary to ensure compatibility with existing legacy equipment. Due to its simplicity, this type of VPN is well suited for getting to know how virtual private networks work.
1. Create a tunnel on your personal system page, and then
2. Go to the VPN settings of your operating system and create a new connection.
Specify the server address msk.site,
On the "Security" tab, select - VPN type - PPTP
Set encryption to "Optional"
Authentication - CHAP. MS-CHAP v2

3. On the IP Settings tab, uncheck "Use the default gateway on the remote network"


4. If you want to use our WINS server service, you can check “Enable Netbios over TCP/IP” (but for a simple tunnel connection this item is not important)

5. Establish a connection and check that the address 172.16.0.1 is being pinged, then check that your computer has received the necessary routes automatically (via DHCP):
172.16.0.0 255.255.0.0
The route that leads to your remote home network 192.168.x.x 255.255.255.0 (if present). .
To do this, run the command route print on your computer. The routes should include those listed above.
PS: In order to combat hung sessions, we forcefully disconnect user tunnels with the PPTP, L2TP, L2TP/IPsec protocols 24 hours after the connection is established. If configured correctly, the connections should automatically re-establish.
Virtual private networks have gained well-deserved popularity. It's reliable and
a secure tool designed to organize cross-site networking
infrastructure and remote access connections. In recent years, among
PPTP occupies a special place among existing VPN protocols. Solutions based on it
common, easy to implement and provide a level of protection sufficient for
most companies.
Why PPTP?
The PPTP tunnel protocol allows you to encrypt multiprotocol traffic, and
then encapsulate (package) it into an IP header that will be sent over
local or global network. PPTP uses:
- TCP connection for tunnel management;
- a modified version of GRE (General Route Encapsulation) for
encapsulating PPP frames of tunneled data.
The payload of transmitted packets can be encrypted (using
MPPE data encryption protocol), compressed (using the MPPC algorithm) or
encrypted and compressed.
PPTP is easy to deploy, does not require a certificate infrastructure, and
Compatible with the vast majority of NAT devices. All versions of Microsoft Windows
starting with Windows 95 OSR2, they include a PPTP client. Also clients for
PPTP connections are available in Linux, xBSD and Mac OS X. Providers are aware of these
advantages, and that is why to organize an Internet connection often
use PPTP, even though it initially has lower security,
than L2TP, IPSec and SSTP (PPTP is sensitive to dictionary attacks, in addition
VPN connection based on PPTP protocol ensures privacy,
but not the integrity of the transmitted data, since there are no checks that the data
have not been altered during shipment).
It is worth noting: in large networks PPTP is preferable to PPPoE. After all, when
using the latter, the search for the server is carried out by sending
broadcast packets that can be lost on switches, and the network is like that
packages are “flooded” quite decently.
Authentication and Encryption
In Vista and Win2k8, the list of PPP authentication protocols is noticeably reduced.
SPAP, EAP-MD5-CHAP and MS-CHAP, which have long been recognized as unsafe (in
They use MD4 hashing and DES encryption algorithms). List of available
protocols now look like this: PAP, CHAP, MSCHAP-v2 and EAP-TLS (requires
user certificates or smart cards). Highly recommended
use MSCHAP-v2, since it is more reliable and provides mutual
client and server authentication. Also, via group policy, specify
mandatory use of strong passwords.
To encrypt a VPN connection using MPPE, 40, 56 and
128-bit RSA RC4 keys. In early versions of Windows, due to export restrictions
military technology only a 40-bit key was available and with some reservations
– 56-bit. They have long been recognized as insufficient, and, starting with Vista,
Only 128-bit key length is supported. A situation may arise
that the client does not have support for this option, so for older versions of Windows
you need to download all service packs or security updates. For example, WinXP SP2
will connect to the Win2k8 server without any problems.
To independently view the list of algorithms supported by the system and
key lengths, refer to the registry key HKEY_LOCAL_MACHINE\SYSTEM\CurrentControlSet\Control\SecurityProviders\SCHANNEL.
In particular, the settings for encryption algorithms are located in the Ciphers\RC4 branch.
You can forcefully activate the desired option by creating the dword parameter "Enabled" and
setting its value to "ffffffff". There is another way that Microsoft doesn't
recommends – activating support for 40/56-bit RC4 keys on the Win2k8 server.
To do this, you need to set the registry value HKLM\System\CurrentControlSet\Services\Rasman\Parameters\AllowPPTPWeakCrypto to "1"
and restart the system.
Setting up a PPTP server in Win2k8
A typical configuration for running a VPN consists of domain controller, servers
RRAS (Routing and Remote Access) And NPS (Network Policy Server). In progress
By configuring these roles, DHCP and DNS services will additionally be activated.
The server that is to perform the VPN role must first install the RRAS role.
be joined to a domain. Unlike L2TP and SSTP, certificates when running PPTP
are not needed, so a certificate server (Certificate Services) is not required.
Network devices that will participate in VPN construction (including
ADSL and similar modems) must be connected and configured accordingly
image (Start -> Control Panel -> Device Manager). For some schemes
A VPN (using NAT and connecting two networks) will require at least
two network devices.
Using the role installation wizard (Server Manager -> Roles -> Install
role), install the Network Access Policy Services role
Services) and go to the selection of role services, where we mark all the components "Services
Routing and Remote Access Services.
Click “Next” and in the next window confirm the settings by clicking “Install”.
The Remote Access and Routing Service is installed but not yet configured and
not running. To configure operating parameters, go to "Server Manager" in
tab "Roles -> Network Policy and Access Services -> Routing and
remote access"; alternatively, you can use the "Routing and
remote access", called from the "Administration" tab of the "Start" menu.
We mark our server in the list (the console can be connected to several
systems) and in the context menu click "Configure and enable routing and
remote access" (Configure and Enable Routing and Remote Access). If before
If attempts have been made to configure the service, then re-install
Some options will have to stop it by selecting "Disable"
routing and remote access." In this case, all settings will be reset.
The installation wizard that appears will prompt you to select a typical server configuration,
which most closely matches the intended tasks. In the selection menu -
five points, four of them provide ready-made installations:
- Remote access (VPN or modem) – allows users to connect
via a remote (dial-up) or secure (VPN) connection; - Network Address Translation (NAT) – designed to connect to
the Internet of several clients through one IP address; - Access to a remote network (VPN) and NAT - is a mix of the previous ones
points, provides the ability to access the Internet from one IP address and
remote connection; - Secure connection between two networks - connecting one network to
another, remote.
The next step for each of these points will be individual. For example, when
setting up SSTP (see article " "), we chose the third
scenario. For PPTP, any of the proposed options is suitable, although the recommended
The "Remote access" item is considered to be the default. If there
difficulties when choosing a scheme, select the fifth item “Special configuration”, or by
After completing the wizard, continue setting up in manual mode. In addition, you can
refer to the documentation by clicking the "More details" link located at the bottom of the window.
At the next step, we mark the list of services that should be enabled on the server.
There are five such points, their names speak for themselves:
- Access to a virtual private network (VPN);
- Remote access (via telephone network);
- On-demand connection (for routing organizational branches);
- Network Address Translation (NAT);
- Local network routing.
Actually, all the presets mentioned above boil down to
activating these services in different combinations. In most cases you should choose
"Remote access (VPN or modem)" and then "Virtual private network access"
(VPN)". Next, you just need to point to the network interface that is connected to
Internet (by marking it with the mouse). If the master detects only one active
connection, it will end with a warning that for this mode
another network card is required, or it will prompt you to go to the settings in the “Special configuration” mode.
"Security using Static Packet Filter" checkbox
It is recommended to leave it cocked. Such filters allow VPN traffic only with
specified interface, and exceptions for allowed VPN ports will have to
configure manually. In this case, you can configure static filters and a firewall
Windows on one interface, but not recommended as it will reduce
performance.
At the "Assigning IP addresses" step, select the method for obtaining IP addresses by clients
when connecting to a VPN server: "Automatic" or "From a specified range
addresses". Account authentication can be done as follows:
RRAS server, as well as any other server that supports the RADIUS protocol. By
The first option is offered by default, but in a large network with several servers
RRAS is better to use RADIUS. This is where the master's work ends. Click
button "Finish", and the window that appears informs you that you need to configure the "Agent
DHCP relay". If RRAS and the DHCP server are in the same segment, and no
problems with the exchange of service packets, then it is not necessary to configure the Relay agent
(by the way, on the internal interface it is activated by default).
Console settings
The settings tree will now be available in the console window. It is advisable to go through
all points to figure out what is where. So, in the paragraph "Interfaces
networks" will show all previously configured network interfaces. By selecting from the menu
item "Create a new demand call interface", you can add a connection
to VPN or PPPoE servers. To view a list of protocols, ports used, and
their states go to “Ports”. The "Customize" button in the "Properties" window allows you to
change the operating parameters of the selected protocol. For example, by default
the number of PPTP, L2TP and SSTP connections (ports) is limited to 128, and
All connections are allowed (remote and on-demand). As
(optional) server ID using the phone number entered in the field
"Phone number for this device."
The "Remote access clients" item displays a list of connected
clients. The number next to the item name will tell you their number. With help
context menu, you can check the status of the client and, if necessary,
disable. Two points IPv4 and IPv6 allow you to configure IP filters, static
routes, DHCP relay agent and some other parameters.
Work with taste
We can’t help but tell you about another feature that will significantly simplify your life.
Administrators - Connection Manager Administration Pack CMAK (Connection
Manager Administration Kit). The CMAK wizard creates a profile that will allow you to
users to log on to the network only with those connection properties that
the admin will determine for them. This is not a new feature of Win2k8 - CMAK was available for Win2k
and supports clients up to Win95. However, providers are still
provide the user with complicated instructions instead of providing him with
ready files with settings.
CMAK is a component of Win2k8, but is not installed by default. Myself
The installation process using Server Manager is standard. Select “Components – Add Components” and in the wizard that appears, check
"Plastic bag
connection manager administration". After installation is complete, the same name
The shortcut will appear in the Administration menu.
When you call SMAK, a wizard will launch that will help you create a dispatcher profile
connections. In the first step, select the OS for which the profile is intended.
Two options are available: Vista and Windows 2000/2003/XP. Their main difference is
is that Vista supports SSTP. Next, select “New Profile”. Eat
the ability to use an existing profile as a template; subsequent
The steps suggest merging multiple profiles. Specify the name of the service
(users will see it after installing the package) and the name of the file where it will be
profile saved. When you create a service profile, the CMAK wizard copies all incoming
to this profile files in Program Files\CMAK\Profiles. On some networks
authentication uses the Realm name, for example in Windows
this is the AD domain name ( [email protected]). The wizard allows you to specify the name of the area,
which will be automatically added to the login. And finally, we add support
VPN connections. Activate the "Phone book from this profile" checkbox and then
select "Always use one VPN server" or "Allow user
select a VPN server before connecting." In the second case, you need to
prepare a txt file with a list of servers (file format).
At the “Create or Edit” stage, select “Edit” so that the “Edit VPN” window appears. There are three tabs (with active IPv6 - four). IN
"General" check "Turn off file and printer sharing" (in most cases this
functionality is not required). IPv4 specifies the addresses of the primary and
additional DNS and WINS servers. By checking the appropriate boxes you can
specify the use of a PPTP connection as the default gateway and activate
IP header compression. Security settings are made in the tab of the same name.
Here we indicate whether it is necessary to use encryption, and mark the necessary
authentication methods. The VPN Strategy list allows you to specify which method
will be used when connecting to the VPN server. There are two options: only
one protocol or enumerating protocols until the connection is successfully activated. IN
In the context of the article, we are interested in “Use PPTP only” or “PPTP first”.
That's it, close the window and move on.
The Add Phone Book page allows you to specify the numbers used
to connect to a dial-up server. If necessary, you can also configure
automatic update of the list of numbers. The Configure Remote Entries page
network access", as well as the window that appears when you click "Change", are similar in
content with "Create or edit". The next step allows you to modify
routing tables on connected clients: better in most cases
leave "Do not change routing tables." If necessary, indicate the parameters
proxy for IE. In addition to standard settings, the wizard allows you to install
actions that can be performed at different stages of client connection
(for example, run a program). Next, we set icons for different situations (windows
connection, phone book, and so on), select the help file, information about
support. If necessary, include a connection manager in the profile. It may
be useful for client systems running an OS that does not contain
dispatcher Here you can also add a text file with the license agreement and
additional files that will come with the profile. This is the job
The wizard is completed - the summary will show the path to the installation file. Copy
it to a public folder so that users can download it freely.
Now users just need to run the executable file and respond to
one and only question: make this connection available to "Everyone"
users" or "Only for me". After which the new connection icon will be
added to "Network Connections" and a registration window will appear in which
You must enter your username and password. Very comfortably!
Managing RRAS with Netsh
Some RRAS server settings can be managed using the Netsh utility
(network shell). You can add an account authentication type by
help team:
> Netsh ras add authtype PAP|MD5CHAP|MSCHAPv2|EAP
For earlier versions of Windows there is also MSCHAP|SPAP. Test mode:
> Netsh ras set authmode STANDARD|NODCC|BYPASS
Register your computer as a RRAS server in AD:
> Netsh ras add registeredserver
Add PPP extension:
> Netsh ras add link SWC|LCP
The SWC extension provides software compression, and the LCP enables the same
PPP protocol extension. Types of multilink communication supported by PPP:
> Netsh ras add multilink MULTI|BACP
Account properties are set as follows:
> Netsh ras set user
Using "set client" you can view statistics or disable the client.
Saving and restoring an RRAS configuration using Netsh is also easy:
> Netsh ras dump > "filename"
> Netsh exec "filename"
In addition, a lot of settings contain the context "ras aaaa".
For more information about Netsh, see the article “Team Run to Longhorn Camp” in
.
INFO
PPTP was developed before the creation of the IPsec and PKI standards and is currently
time is the most popular VPN protocol.