How to install Windows directly from a hard drive using different methods? Installing Windows from a hard drive Installing Windows 7 from a bootice hard drive
Hello, site administrator remontcompa.ru, I have a question for you - how to install Windows 7 on a new computer, that is, on a blank hard drive without partitions? Surely there are some rules and if you don’t follow them, problems will definitely arise that you want to avoid. Georgy.
Installing Windows 7
Hello friends! Installing Windows 7 on your desktop computer or laptop from a disk, as well as from a flash drive, should not be accompanied by any difficulties after reading our article. We have prepared for you a detailed description of each step and included many illustrations. Having gone through all the installation steps with us, next time you will install Windows 7 without any outside help.
- Firstly, the official Windows 7 64-bit distribution can be downloaded from the official.
- Secondly, if you have UEFI BIOS and you want to install Windows 7 on a GPT disk, but don’t know how to do it, read our article.
- Thirdly, if you bought a new laptop with Windows 8.1 and want to install Windows 7 instead, then all the manipulations with the UEFI BIOS and the process of further system installation.
- Fourthly, if you have problems installing Windows 7, refer to our article -.
- Fifthly, if you don't have a disk drive, you can use our instructions and.
- Sixth, if you are installing Windows 7 from a flash drive, then be aware that Windows 7 does not support USB 3.0 (ports are usually colored blue), if your flash drive is USB 3.0, insert it into a USB 2.0 port.
So, final preparations before installing the operating system. What should you do first?
If you are installing Windows 7 on a hard drive with existing partitions, then you need to copy all your data from the partition on which you will install Windows 7. During the installation process, this partition will be formatted and information from it will be deleted.
If you are installing Windows 7 on a blank hard drive, then you don’t need to do anything, just read the article further.
In general, there is nothing complicated in all this, at the very beginning of the boot we press on the keyboard, in most cases these are the F2 or Delete keys, we entered the BIOS, here we need the “Boot Sequence” or “Boot” section. There are basically two types of BIOS, this window is Ami BIOS, we will look at setting it up in our article, if the window has a different interface, then you have Award BIOS, how to work in it is written in our article “BIOS booting from disk ".
As we can see, the first boot device is the hard drive - HDD: PM-MAXTOR STM3, use the arrows to highlight the first item 1st Boot Devise and press Enter.

In this menu, we will set the CD-ROM as the first boot device (First Boot Device), select it using the arrows on the keyboard, then Enter.

So the first disk drive, and the second one turned out to be a hard drive, that’s what you need.

Save the settings (press F10) and reboot.
If you have correctly set the BIOS to boot from the drive and you have an installation disk with Windows 7 in it, then the next time you boot the computer you will see a prompt on the monitor to boot from the Windows 7 installation disk - Press any key to boot from CD or DVD. We press any key on the keyboard, keep in mind that if you do not have time to press within a few seconds, the system will reboot and everything will start from the beginning.

The installation process of the operating system begins, wait patiently

Here you need to select the system language.

Install

We accept the terms of the agreement

Selecting the full installation

In this window we see the space of my 500 GB hard drive ( Disk 0) divided into two sections (Section 1 and Section 2). The Windows 7 operating system is already installed on the hard drive; I personally don’t need it and I want to reinstall it. Before installation, I will delete all existing partitions on the hard drive and create them again. In general, there is a rule that if you want to avoid errors when installing Windows 7, it is better to delete all existing partitions before installation and create them again or install the operating system directly into unallocated space.
Select with the left mouse Disk 0 Partition 2 and press the button Delete.


Select with the left mouse Disk 0 Partition 1 and press the button Delete .


Old sections have been deleted, we are creating new ones.
Select with the left mouse Unallocated disk space 0 and press Create.

In this window, you need to select the size of our future disk (C:), Windows 7 will be installed on it. Let’s choose a size of 200 GB, I think this will be quite enough. Click Apply.

For Windows 7 to work correctly, you need to create a hidden partition of 100 MB with download files.
Therefore, when asked “To ensure that all of its features work correctly, Windows may create additional partitions for system files,” click OK.

On Disk 0 we now have a hidden partition Section 1: System Reserved(volume 100 megabytes) with Win 7 download files.
A second Partition 2 has also appeared, it will be the system drive (C:), its volume is 196.1 GB.
We convert the unoccupied space into a partition. Select it with the left mouse and click Create, this will be our drive (D:).

Apply

We will install Windows 7 on Disk 0 Partition 2: (future drive C:), select it with the left mouse and click Next.
In this article I will talk about how to independently install the Windows 7 operating system from a disk onto your computer or laptop.
I offer detailed and step-by-step instructions with a visual demonstration of screenshots of installing the Windows operating system.
If you think that installing an operating system is something complicated and incomprehensible that only a specialist can handle, then I will disappoint you: this is not true. Now you can see for yourself.
All you need to install Windows 7 (or Windows 8) is a computer or laptop, a disk with the operating system (since in this article we will install Windows from a disk), detailed instructions, which I will now provide you with, and, perhaps, attentiveness! Hopefully after installation you won't look like . 🙂
After installation, I recommend installing it immediately. You understand that in our time of electronic payments this is very important. Also now (yet) nowhere without Adobe Flash Player. What's his name Right install read . You may also be very interested in not bad. If you store it on your computer private information, create a .
Important: The majority of all possible problems that arise when installing Windows 7 are associated with an incorrectly prepared installation disk and (or) the quality of the “OS build” recorded on it. You can read the article on how to correctly burn an operating system image to disk.
Remember: if this disc is not out of the box, that is, purchased in a store, then you need to use only original images from Microsoft MSDN. It is the original image, which is just as accessible on the Internet as various assemblies, that is the key to the successful installation of Windows and its normal functioning.
Do not use assemblies of unknown origin. You install all third-party fixes, corrections, and homemade assemblies at your own peril and risk. The consequences may be irreversible.
Before installing Windows 7:
Remember two basic things to do before installing Windows.
First- this is to decide in advance on which partition of the hard drive the system will be installed. As a rule, in most cases this is the C:\ drive. You should remember (or create) the volume label and size.
Remember, your desktop is entirely located on the C:\ drive, or rather, here: C:\Documents and Settings\ Username\Desktop. Think in advance about the integrity and safety of files that are important to you, copy them from your desktop, that is, from drive C, to another drive or flash drive.
All programs installed on the C:\ drive will also be deleted, but this is not a reason to drag the entire folder with programs to other drives. It is much easier to reinstall these programs on a clean system. Don't be lazy, it's not every day that you reinstall Windows.
Second moment - these are drivers for your computer or laptop. They need to be taken care of in advance. Most laptops come with them included, but if they are not available (or need to be updated), look for them on the manufacturer’s official website and download them in advance.
I recommend reading everything you need to know about installing drivers in the article “Installing Drivers or Five Iron Rules,” which is located.
If you skip this important point, then after installing Windows, you may be left without the Internet, because it is not a fact that the Windows distribution will initially contain drivers for your network card.
Installing Windows 7 from disk:
Insert the disk with the Windows operating system into the drive and restart the computer. By the way, if you don’t have a disk drive, you can install the Windows operating system using a regular one.
Let's continue. Our task is to configure the computer to boot from a DVD. This can be done in 2 ways:
- 1. select the device (DVD) in a special boot menu;
- 2. change the boot priority in the BIOS (from HDD to DVD).
The first method, selecting a device in the boot menu, is simpler and more convenient. After installing Windows, there is no need to return booting from the HDD (hard drive). However, on older computers this function is not available and in this case you will have to go into the BIOS and change the boot priority.
Start - reboot, wait until the screen goes dark and at the first sign of the system waking up (the logo appears), press and hold the Delete key on the keyboard. Why the Delete key? These can be the keys F1, F2, F3 + F2, F10, Ctrl + Alt + Esc, Ctrl + Alt + S, Esc.
There is no universal button for entering the boot menu or entering the BIOS, and it all depends on the computer manufacturer (motherboard). The surest way is to read the instructions from the computer or motherboard. The table below shows a clear example of such keys.
The boot menu looks something like this:
Press F10, agree and confirm the exit with saving (Save and Exit) by selecting “Ok”.
Phoenix Award
Let's consider the second interface option. To boot from disk, you need to change the priorities so that the first device is the DVD drive. Find the item “Advanced BIOS Features” and use the arrows to switch to the first device (First Boot Device), change to CDROM.
Press F10 and confirm Save and Exit.
If you have problems at this stage, I recommend watching this video.
Let's continue. If everything was done correctly, we will see the following window with the inscription: “Press any key to boot from CD or DVD.”
Here you need to press any key, for example, spacebar. This is only done 1 time and only at this stage of installation. We see the following window with the inscription “Windows is loading files”.
The files are being extracted, after which we will see the message "Starting Windows" and the Windows 7 installation window itself. Windows installation has begun!!
Select the desired language and click “Install”.
Next, we need to select the edition of Windows 7. Select the one for which you have a key or which you are going to activate. On laptops, it is usually indicated on a piece of paper with a key located on the bottom of the laptop. Entering the serial number itself will be a little later; it has been moved to the end of the installation.
A few words about the possibility of installing a 32-bit (x86) or 64-bit version of Windows. If you have more than 4 GB of RAM (also known as RAM, Memory), then install 64-bit, if not, then 32-bit (x86).
Let's read and agree to the license terms. Next, we need to select the installation type - select “Full installation”.
Now you need to select the partition on which Windows will be installed.
If you have this partition reserved by the system (note, it is still in megabytes (MB), not gigabytes), for example, as in the following screenshot, then select Disk 0 Partition 2.
To avoid such excruciating pain when choosing a partition, before installing Windows, look at how many gigabytes your C drive occupies.
If you have one partition on your hard drive and it is larger than 250 GB, then it would be more correct to create two local disks. One section is specifically for Windows (usually about 50-100 GB), and the other is for storing your personal information (how much will remain, XXX GB).
Note: The partitions you create should be named Disk 0 Partition 1, 2, 3..., not “Unallocated Disk Space”. Otherwise, the operating system simply will not see sections with such names.
If necessary, create a section or sections and click “Apply”:
Attention: At this stage, problems may arise - when Windows 7 asks for a driver for further installation or when the system does not see your hard drive to continue installation.
Or install (if prepared) hard disk controller drivers. If you already have two or more partitions on your hard drive, then you can skip the above point. So, we have selected the “System” section, and now we need to start formatting.
The installer warns that all our data will be deleted. This is what we need, because we are interested in a clean installation of Windows. We agree and wait. Usually the whole process takes a matter of seconds. After formatting, we see that there is more free space, calmly click “Next”.
And here is the beginning of the installation, the process has started. You can already exhale).
We're waiting... Usually it takes 15–25 minutes. When our system is installed, it will prompt you to enter your username and computer name. Let's enter.
If you wish, you can enter a password and a hint. Next, Windows will prompt you to enter your serial number. Enter (if available). If not, then skip this step and uncheck the “Automatically activate when connected to the Internet” checkbox.

Many of those who have encountered the installation or re-installation of Windows systems know that in most cases external media such as USB drives are used to carry out this operation. If you try to run from a hard drive, the user will not get the desired result. Therefore, for Windows 7, installation from a hard drive must be done using completely different techniques. For the average user, there are five main options, which we will now discuss.
Windows 7: installation from hard drive. Installation options
So, let's look at some directions in installing the seventh version of the system. Among the main options are the following:
- installation on top of the old “seven”;
- installation as a second OS;
- installation using the command line;
- use of special utilities;
- installing the system on an external HDD.
Each of these methods has its own advantages and disadvantages, but for all of them one common rule is the presence of an image of the installation distribution of the system, which you will subsequently have to work with. In addition, if your computer already has hard drive partitions created, you can leave them alone when installing Windows 7. Otherwise they will need to be created. But more on that later.
Preliminary information
Now let's look at some initial conditions that must be met when installing the system.
The system requirements are such that a system with 32-bit architecture requires at least 16 GB of free disk space, and for an x64 system - about 20 GB. And this is provided that there is an already installed system, the directory of which will be renamed to Windows.old after installation. Under no circumstances should you delete it manually (unless you do a disk cleanup). Then it will simply be impossible to roll back.
Installation over the old system
Using this technique, you immediately need to understand that formatting your hard drive when installing Windows 7 will not work, even if it is a system partition. But we will rely on the fact that the distribution is on drive C when the partition is done. How to partition the disk will be discussed later.
As is already clear, the downloaded distribution must first be placed on an independent partition (usually drive D). You can, of course, start the installation from there, but then errors will appear. Now we simply select the Setup.exe installation file from the Archive directory, followed by the installation of Windows 7, which is no different from the standard procedure.
In this case, for Windows 7, installing from a hard drive is more of a means of updating system files, since the new configuration may inherit errors from the old one. It is not comfortable.
Alternative method for installing Windows 7 as a second OS: what might you need?
However, you can do it differently. There is a way to install it not on top of the existing OS, but as an additional OS, which can then be loaded when selected from the boot menu. The main thing is to create a boot partition on the source volume.
To carry out all operations, you only need to have an application that can work with images and create a utility that creates an MBR boot sector on the selected partition. As an example, we use Daemon Tools and the EasyBCD program.
Creating a section
It may be impossible to simply download the installation distribution, even if it is located on the system disk. This is only due to the fact that the system itself does not recognize it, and if it sees it, it sets a ban on downloading. Here you need to go to the disk management section, which can be accessed through computer administration.

Fortunately, Windows 7, like all subsequent versions, has such a tool. First, we look at virtual partition D. Call up the menu and select volume compression (the specified size should slightly exceed the volume of the distribution). Next, right-click to open the menu and use the command to create a simple volume (without this, the system will not determine that this partition is operational).
It’s clear how to partition a hard drive when installing Windows 7. Let's get to the most important part.
System installation
Now we are directly interested in installing Window 7. The hard drive systems are such that they still do not see the distribution.
We launch the Daemon Tools program and mount the image using the appropriate command, specifying the path to the saved file. We copy it to the newly created partition (unpacked image file).

Now we launch the EasyBCD application and click the add entry button, after which we indicate the WinPE tab at the bottom, and then enter “New Volume” in the name field, and in the path line we determine the location of the boot.wim file.

After the entry is added, simply restart the computer or laptop. At the same time, the standard installation of the “seven” starts.
Installing Windows 7 using the command line
Again, this option cannot be used when the initial system is damaged or buggy. But in case of restoration it will do.

When Windows starts, press the F8 key (standard method, unlike Windows 10) and select the troubleshooting line from the menu (first in the list). In the additional parameters we indicate the same thing, after which we use what we need in the language selection window and proceed to system recovery, where we select the command line.
We write two lines in the console:
- X:\>windows\system32>E;
- E:>setup.exe
Don't be afraid to make mistakes. The drive letters in DOS and Windows do not match. In extreme cases, it will simply throw an error, after which you will need to correct the corresponding symbol, but, as a rule, this is not required. Well, then the process begins, no different from the standard one. Please note that in this case there is no need to even reboot the system.
Installation on top of any system using the BOOTICE utility
Now let's say we want another installation of Windows 7. We have a formatted hard drive. The catch is to create a boot device in the form of a HDD partition.
The BOOTICE utility is designed to emulate the continuation of the installation of Windows 7, creating and overwriting the boot sector (for this purpose, there is a bootmgr folder in the unpacked distribution).
To begin the installation, you need to change the MBR boot record to GRUB4DOS. But here you need to take into account one feature. The fact is that the utility requires creating a bootloader manager name of no more than five characters (letters).

Rename the bootmgr file to GRLDR, and then launch the utility itself. A new entry is immediately visible in the menu, so put a checkmark there (destination disk), and then press the change installation button and select saving to disk in the configuration. All that remains is to reboot the device, after which the installation of Windows 7 will be activated. Installation from the hard drive will follow immediately. As a rule, there should be no problems.
Installing Windows 7 on an external hard drive
But, despite all the nuances of installing the “seven” on a hard drive, some users try to install the system on removable media, in particular USB-HDD. What to say? This is fundamentally wrong!

The question arises: why create problems for yourself out of the blue? Booting from any USB device is much slower than from a hard drive. The external drive itself (hard drive) is subject to stronger physical impact and is not immune to failures and errors. However, “especially gifted” users will have to use (at a minimum) a virtual machine. And many of these “prodigies” have no idea what it is.
Of course, for the rest we can say that any virtual emulation, for example, using WMWare or the same built-in Hyper-V module can be carried out quite simply. But the matter will not be limited to automatic settings. Here you will have to set the parameters corresponding to the system configuration. And all those who claim that with the operating system installed in it can be created in a couple of clicks and in five minutes are absolutely wrong. Nothing like this!
Possible errors and failures
Now the saddest part. What to do if installation Issues of equipment failure are not considered as a matter of principle. The external hard drive must be enabled in the BIOS, as well as boot priority from the main device.
If you have problems with the file system, you can always use a command like sfc /scannow or chkntfs x/ c (if partition C is selected as the system drive). Well, if the hard drive “crumbles”, there’s nothing you can do about it. We'll have to change it. Although... Many experts advise first using a program that supposedly reverses the magnetization of the disk surface, but this method is hard to believe.
On the other hand, when installing the system on an external drive, you cannot do without utilities like ImageX, included with the Windows AIK package. In addition, the PWBoot module does not recognize Cyrillic characters at all, but works like a command line. So is it worth doing?
And that is not all! When you start selecting multiple simultaneous installations, you will have to choose between the standard VHD container format and a regular removable device. It is believed that the VHD format is read faster, but the problem of enabling this type of media lies precisely in the use of BIOS settings. And when switching from BIOS to UEFI (which is not always supported), there can be significantly more problems. However, for Windows 7, installation can be done using any of the above methods. But in most cases, formatting partitions will not work.
Thus, the conclusion suggests itself that the simplest is the ideal solution. The average user will not use specific methods to create boot sectors. It's obvious. But the method of updating the system looks much simpler, but it also has its drawbacks. In general, it is better to perform a “clean” installation, having first copied the necessary information to another medium.
Just reinstall Windows from the hard drive. I started setting up Bios as usual and unfortunately I couldn’t set up this BIOS. The flash drive does not work either as a HDD or as a USB. The BIOS is not designed for this, although the motherboard and firmware are from 2010.
There is no disk with Win 7, but there is its image and the Bootice program, I will install Win from the hard drive.
New volume for Win image
I'll start by setting up a new volume. Win 7 has a good hard drive management feature. You need to create a new volume and the beauty of the program is that it physically compresses space from any volume. On the icon My computer(In Start, on the desktop) right-click and select from the context menu Control. A window will open, you need to select a section Disk Management. On the computer, volume D is larger, so I will select it. I go to the context menu and click Shrink Volume.
The application reports that I have 62570 MB available for compression, but this is a lot; I will leave about 12 GB and compress the space.

Almost 12GB is free on the disk, it can be formatted. Again right key in the context menu Create a simple volume

The wizard should launch, just click Further

You can also not change anything, the size is at the maximum

You can choose the name of the new section, but it doesn’t matter, I press Further

I choose formatting in NTFS and I sign the local disk with a label Win

The wizard will complete all settings, you can close all windows. New P Win volume on the computer


Now the Windows image needs to be unpacked into a new Win volume. It’s convenient for me to do this using WinRAR, just unpack it.

Bootice Preparation
An application that will help you replace the boot record with your own with the necessary parameters.
After restarting, the computer will begin installing Windows
Among the unpacked files I will rename the file bootmgr V br, arbitrary name up to 5 characters. This is what the program requires

I'm launching the Bootice application. I select the hard drive, click Process MBR to start editing parameters

And to install Windows you need to select a bootloader GRUB4DOS and press Install/Config

Renamed File name press to save Save to disk

If everything is configured correctly, the following window will appear and you can restart the computer to install Windows

The installation is no different from the usual one, as well.
With uv. Eduard Orlov
Let's take a closer look at installing (reinstalling) the operating system (hereinafter referred to as OS) Windows 7 from the distribution kit, which is located on the computer's hard drive. This method has some advantages - installation is faster, since the reading speed from the hard drive is higher and errors in reading the CD in the optical drive are also eliminated. The Windows 7 OS distribution must be unpacked using any archiver convenient for you onto a partition () of the disk that is not subject to deletion during the installation process - usually a partition on D.
Let's look at three installation options:
Each option has its own advantages and disadvantages, which will be discussed below. The general disadvantages are the inability to use on computers with UEFI (replacement for an outdated BIOS), which support GPT (new disk partitioning methods replacing MBR) and the inability to restart the installation if you make mistakes, or detect a hardware malfunction during the installation process (in this case , you will have to resort to installation from a CD or flash drive).
Further descriptions refer to the installation of one OS, on a computer with one hard drive, since when installing a second OS there are features that are not included in the scope of this site page.
And so in order:
Installing Windows 7 from a hard drive from an old Windows 7 OS.
- Inability to change partitions during installation (format partition C If you can’t, the installation will not be completely clean);
- The inability to start the installation in case of some damage to the current Windows 7 OS and the inability to start the installation of some non-original versions of Windows (on assemblies the message “Error code: 0x8030002F” will pop up);
In order to have enough in the section WITH space for the new OS, there must be more than 16 GB of free space on it (for a 32-bit system) or 20 GB (for a 64-bit system).
And so, - unpack it using any archiver convenient for you (for example, WinRAR) into a partition (we are used to saying disk) D“*.iso” distribution image.
Picture 1.
The distribution kit includes 5 folders and 3 files circled in the figure. Here the “Archive” folder conventionally denotes the user’s folders and files in the section - they will not interfere with us. The main thing is that there is enough space on the partition (the volume of the unpacked distribution is approximately 2.32 GB).
To start the installation, run the file setup(application 110 KB).
The installation of Windows 7 begins, the sequence of which is almost the same as installation from a CD.
But here I would like to dwell on the peculiarities of choosing a partition for installing Windows.

Figure 2.
Here you see three main hard drive partitions created when Windows 7 was previously installed.
- Partition 1 - 100.0 MB. Hidden - it is not visible in Windows Explorer. The main purpose of this partition is to store and protect hardware files and the boot folder, which tells the computer where Windows starts. The attributes of this section are: System, Active, Main section. This section may not exist! When marking free disk space, Windows 7 automatically determines the need to create this partition depending on the presence of an active partition in the system and the number of existing partitions (based on the limitation that there cannot be more than four main partitions). The size of this section can be 100÷350 MB depending on the Edition of Windows 7.
- Partition 2 - 99.9 GB. In Windows Explorer you see it as a disk C. It contains operating system files and some user files.
- Partition 3 - 1763.0 GB. In Windows Explorer you see it as a disk D. It contains user files. In this case, we placed the Windows 7 installation distribution kit on it.
In the installation option under consideration, we cannot do anything with these partitions (including formatting Partition 2) - select Partition 2 and press the button Further.

Figure 3.
A Windows Installation warning appears, telling you that “The selected partition may contain files from a previous Windows installation. If so, these files and folders will be moved to a folder called “Windows.old”. You will be able to access the information in the “Windows.old” folder, but you will not be able to use the previous version of Windows.” We agree - press the button OK.
The installation of the Windows 7 OS continues, as a result of which new files and folders of the new Windows 7 OS will appear in Section 2, and the files and folders in Section 1 (if present) will be overwritten.

Figure 4.
After installing Windows 7, open your local drive in Windows Explorer C you will see the files and folders located on it (in this case, the “show hidden files and folders” options are enabled), including the above-mentioned folder Windows.old with files from the previous OS. You can enter it and copy and save the files you need in another location. In the future, if unnecessary, you can folder Windows.old delete by running Disk Cleanup.
Running Windows 7 installation from your hard drive from the command line at the start of booting old Windows 7.
The disadvantages of this installation option include:
- The inability to start the installation due to some damage to the current Windows 7 OS and the inability to start the installation of some non-original versions of Windows (assemblies);
- The OS must be of the same bit size - 32-bit or 64-bit.
This installation option allows you to perform a “clean” installation by deleting partitions containing the old OS and creating them again.
And so, - we assume that you unpacked the distribution kit into the root of the partition next to the partition with the OS (subsequent ones are possible - it only affects the choice of letter in the command). To start installation you need to run the distribution file setup.
exe, located in the root of the section (do not confuse it with setup.exe located in the sources folder).
While starting (rebooting) the computer, hold down the F8 key.

Figure 5.
When the “More boot options” menu appears, select “Troubleshoot your computer” (suggested by default) and press the key Enter.

Figure 6.
In "System Recovery Options" select the keyboard input method and press the button Further.

Figure 7.
Select a user, if you have a password set, enter that too. If not installed, then leave the field empty and click the button OK.

Figure 8.
Select the recovery tool, click on the option: Command line .

Figure 9.
Here you need to run two commands:
- Go to the partition on which the distribution is located;
- Run the file in this section setup. exe.
We add in the first command: “X:\>windows\system32> E:»
and press the key Enter. Here you need to take into account that in MS DOS the partition letters do not match those that you see in Windows Explorer (the hidden system partition is not visible in Windows Explorer - in MS DOS it is visible under the letter C).
In the second command we add: “E:> setup.
exe"and press the key Enter.
Don't be afraid to make a mistake - if an error occurs, the command will simply not be executed with an error message.


Figure 11.
Press the button Install.

Installing Windows 7 from a hard drive under any OS that can install a new MBR (master boot record) on the hard drive using the BOOTICE utility.
The computer must be running any Windows OS that allows you to place the unpacked distribution kit into the “root” of any non-deletable partition (logical drive) and allow you to run the BOOTICE utility. The BOOTICE utility is required to install a new MBR (master boot record) on your hard disk.
The principle is simple - during a reboot, the new master boot record you installed does not launch the OS installed on the hard drive, but the boot manager available in the unpacked distribution, which continues the installation of Windows 7, which proceeds further, as when installing from a CD. During the installation process, the MBR you installed is automatically replaced with the standard MBR of Windows 7.
And so we consider everything in detail.
To avoid errors and prevent limitations on installation capabilities, we disconnect all unnecessary drives and leave only one hard drive.
We assume that the “*.iso” distribution image is located on the partition’s hard drive D. We unpack it with any archiver convenient for you (for example, WinRAR) to the “root” of the partition (we are used to saying disk). After unpacking we will only need three folders boot, efi, sources and download manager bootmgr, - the rest is not involved in our “clean” installation (“*.iso” distribution image is also not involved). Available in section D your files will not interfere (the main thing is that there is enough space), the New MBR will launch the boot manager upon reboot bootmgr(we will rename it below). There or in an accessible place you should place the BOOTICE utility file (size about 150 KB) - you can download it, for example, from this link.
After that you have the files on disk D will look like this (unused folders and distribution files are not shown):
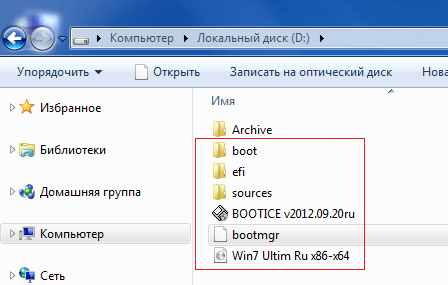
Figure 13.
To run Windows 7 OS, MBR type is used WindowsNT 6
xMBR.
To start the Windows 7 installation process, we need the boot manager to start when the computer restarts. bootmgr. This can be done by changing the master boot record of the MBR hard drive to type GRUB4DOS. We will do this using the BOOTICE utility.
But there is one peculiarity - GRUB4DOS requires the name of the boot manager file to be no longer than 5 letters! Therefore the boot manager file name is bootmgr will have to be shortened.
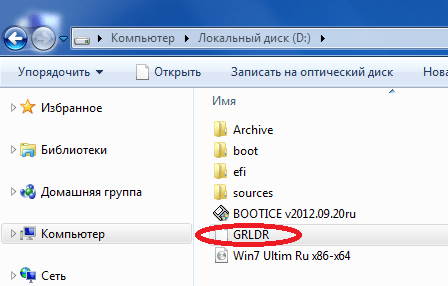
Figure 14.
The name itself does not play a role here - the main thing is that it is no longer than 5 letters and matches what is specified in the “GRUB4DOS Configuration”. So let's rename it to GRLDR, - to the one that the BOOTICE utility will later offer us by default (Figure 17). The next time you boot the computer, a new boot record will be found and on any partition (and even logical drive) of the hard drive it will launch the boot manager under the name GRLDR.
And so the necessary files are there, we launch the BOOTICE utility.

Figure 15.
We have one hard drive - it is visible in the “Destination drive” field. To replace the MBR, press the button DoneMBR. We do not touch the PBR installation.

Figure 16.
On the “Master Boot Rekorder” tab, enable the option and press the button Set/Change.

Figure 17.
In the “GRUB4DOS Configuration” window that opens, make sure that the file name GRLDR corresponds to the boot manager we renamed above and click the button Save to disk.
Then pressing the button Exit(Figure 15) close the BOOTICE utility.
That's it - the preparatory stage is completed. You can start installing Windows 7!
Reboot the computer. During boot, the old OS will no longer start for us, since its master boot record is no longer on the hard drive. Instead, we have already recorded GRUB4DOS 0.4.5c/0.4.6a (grldr.mbr), which will launch the boot manager file with a new name GRLDR.
The installation of the new OS begins... Its procedure is similar to installation from a CD, see.
With this installation, you can delete partitions you don’t need (of course, except for the partition containing the distribution) and create new ones in their place.
After reading all of the above, you realized that having carried out the preparatory operations described in this method on the hard drive, you can turn off the computer and transfer the hard drive to another computer. When you turn on another computer with this hard drive, the installation of the operating system will begin immediately.
That is, if the computer does not have a CD drive and there is nowhere to insert a flash drive, then please, there is a ready-made solution for you!