How to connect a VPN connection and configure it correctly on Windows. Setting up a VPN connection and VPN server Windows Default VPN port Windows 7
Let's talk about virtual private networks (VPNs). What is it, how to set up a VPN on your home computer and work equipment.
What is a VPN server
A VPN server is special equipment that contains accounts of clients using VPN (Virtual Private Network) technology. VPN is needed in order to create a secure communication channel such as node-to-node, node-to-network or network-to-network, for the secure transmission of traffic over the network. The technology is used by remote employees who work from home, but can access the work network “as if it were their own.” VPNs are used by large companies to connect with branches in other cities or to connect several offices in one city.
The technology allows you not only to encrypt traffic, but also to access the Internet on behalf of the VPN server, replacing the IP address and location. We can say that it is very popular in the modern world. Used to increase anonymity on the network and bypass site blocking.
You can create a VPN server on your own, or you can rent it from a provider.
How to set up on Windows 7
- Go to “Control Panel” - “Network and Sharing Center”.
- From the menu on the left, select Change adapter settings. A window with current connections will open. Press the Alt key, a standard menu will appear at the top. In the File section, select New Incoming Connection.
- Let's start setting up, following the instructions of the connection wizard.
- The system will provide you with a list of users who will be allowed to connect to the computer. You can create a new user.
- We select the method for connecting users to the computer.
- We select the network programs that we want to allow for incoming connections.
- We complete the connection.
To work via a VPN, you need to configure a firewall, otherwise the connection will be blocked. The easiest way is to specify “Home network” in the connection settings.
If the computer is located behind the router, you need to configure port forwarding. There's nothing complicated about it.
Settings on routers from different manufacturers may differ. You may need individual instructions for your model.
Separately, it should be said that in order to connect to a computer from the outside, it must have a “white” IP address. Permanent, visible from the Internet. It can be rented inexpensively from a supplier.
Client connection to VPN server on Windows 7
Everything is much simpler here:
- Go to Network and Sharing Center.
- Select “Set up a new connection or network”, and in the list that opens, select “Connect to a workplace”.
- Create a new connection. To the question “How to connect?” answer "VPN". You will need to enter the server IP address, login and password for your account on the server. You will not be able to connect without an account.
- If you don’t need to connect right now, check the “Don’t connect now, just set up to connect in the future” checkbox.
Errors that may occur when connecting
- Error 807. Check your Internet connection. If the physical connection is fine, restart your computer and router. Check if the time on your computer and time zone are wrong - there should be no discrepancies. Your antivirus and firewall may be blocking your VPN connection. If you are not a specialist, it is advisable to simply disable all network filters while working. If you are concerned about data security, create an appropriate rule in your firewall settings.
- Error 868: The hostname does not resolve to an IP address because the DNS settings are missing or incorrect. DNS service is disabled. This may occur because port 53 is blocked by a firewall. We also cannot rule out problems on the provider’s side.
- Error 628. Most often occurs due to server overload. Occurs if the equipment settings for connecting to the Internet are incorrectly set, or Internet access is not paid for.
Third-party tools for creating a VPN connection
The connection can also be created using third-party tools.
Open VPN
OpenVPN is a free service for creating a secure connection (IP network tunneling). You can download the program on the official website of the program of the same name.
The software is presented for both Windows and Linux. On a Linux system, just open a terminal and enter the command apt-get-install openvpn. For Windows, you need to download the installation file corresponding to the operating system bit size (32 or 64 bits).
- Run the installation file.
- Follow the installation wizard's instructions. All settings can be left as default.
- During the process, the program will ask you to install an additional driver - agree.
- Information about the program can be found in the Readme file.
- To connect via VPN, you must have a configuration file provided by the other party. Copy it to the OpenVPN folder.
- In the program shortcut properties, specify that it should be run as an administrator.
- Launch OpenVPN. In the settings, select "Use configuration file". If you don't have this file, you can configure the connection through a proxy server yourself.
On Linux, the start is carried out with the service openvpn start command. Connecting the config file - openvpn/etc/openvpn/client.conf.
IPSec tunnels
The IPSec security protocol allows you to encrypt traffic at the network level of the OSI model, that is, at the level of IP packet transmission. For a successful connection, you need to configure the protocol on both sides of the connection. IPSec VPN is considered the most reliable means of connection, for example, for company branches.
For example, consider the type of IPSec connection between two networks, as shown in the figure:
Consider the configuration for a Cisco router:
R1 (config)#int f0/0
R1 (config-if)#ip address 1.1.1.1 255.255.255.252
R1 (config-if)#no shut
R1 (config-if)#int lo0
R1 (config-if)#ip address 2.0.0.1 255.255.255.255
R1 (config-if)#no shut
R1 (config-if)#crypto isakmp policy 10
R1 (config-isakmp)#authentication pre-share
R1 (config-isakmp)#encryption aes 128
R1 (config-isakmp)#group 5
R1 (config-isakmp)#hash sha
R1 (config-isakmp)#exit
R1 (config)#crypto isakmp key 0 123 address 1.1.1.2
R1 (config)#access-list 101 permit ip host 2.0.0.1 host 2.0.0.2
R1 (config)#ip route 2.0.0.2 255.255.255.255 1.1.1.2
R1 (config)#crypto ipsec transform-set TR esp-aes 256 esp-sha-hmac
R1 (cfg-crypto-trans)#mode tunnel
R1 (cfg-crypto-trans)#exit
R1 (config)#crypto map MAPP 10 ipsec-isakmp
R1 (config-crypto-map)#match address 101
R1 (config-crypto-map)#set peer 1.1.1.2
R1 (config-crypto-map)#set transform-set TR
R1 (config-crypto-map)#do wr mem
When configuring IPSec on Cisco routers, similar operations must be performed on the second router. The exceptions are IP addresses of nodes and interface names. The key specified in the settings can be anything, but must be the same on both sides of the connection.
When setting up a tunnel with a MikroTik router, the following set of commands can be used:
> ip dhcp-server add interface=ether1 name=dhcp1
> ip ipsec proposal add enc-algorithms=aes-128-cbc nmae=10 pfc-group=modp1536
>ip ipsec proposal add name=proposal
> ip address add address=1.1.1.2/30 interface=ether1 network=1.1.1.0
>ip address add address=2.0.0.2 interface=ether2 network=2.0.0.2
> ip dhcp-client add disabled=no interface=ether1
>ip ipsec peer add address=1.1.1.1/30 dh-group=modp1536 enc-algorithm=aes-128 generate-policy=port-override secret=123
> ip ipsec policy add dst-address=2.0.0.2/32 priority=10 sa-dst-address=1.1.1.1 sa-src-address=1.1.1.2 src-address=2.0.0.01/3 tunnel=yes
> ip route add distance=1 dst-address=2.0.0.2/32 gateway=1.1.1.1
For more information, you can refer to your router manuals. For home use, configuration between routers can be done in their web interface.
Video: working with a VPN server
In conclusion, a little about safety. Although third-party services actively offer services for a “secure” VPN connection, we must not forget that all logs are stored on the servers of the VPN providers. Unscrupulous providers can collect information about clients in this way and then use it for their own purposes. The dangerous category includes various Internet extensions for browsers - “anonymizers” - which often do not even hide your real IP. Only your common sense can ensure complete anonymity and security on the Internet. Good luck!
Many businesses use a VPN to transfer data between computers. To set up a VPN, Windows 7, XP, 8 and 10 have built-in software that allows you to create a private virtual network in a few minutes and use it to protect private information.
Settings via Control Panel
On Windows XP, Vista and later versions of the OS, you can create and connect to VPN networks using built-in software. Let's consider this connection step by step:
If the remote VPN server receives the correct data, then within a few minutes the computer will connect to the new private network. In the future, you do not need to configure the connection each time; it will be in the quick connection selection section. 
Additional connection properties
For the connection to work correctly, it is recommended to slightly change its parameters. To do this, after clicking the Connections button, in the menu that appears, select the Properties button. You can also open these properties through the “” section from the Control Panel.

Follow the instructions:
- Go to the section " Are common", uncheck " First dial the number for this connection».
- IN " Options» disable the item « Enable login domain in Windows».
- In chapter " Safety"needs to be installed" Point-to-Point Tunnel Protocol (PPTP)" From the checkboxes we mark “ Password Authentication Protocol (CHAP)" and following it " Microsoft CHAP protocol version 2 (MS-CHAP v2)».
- In chapter " Net"check only the second box (TCP/IPv4). You can also use IPv6.
Setting up a VPN on Windows xp, 7, 8, 10 through the Control Panel is the same in terms of execution algorithm. The exception is a slightly modified design depending on the operating system version.
After the connection is established, you need to figure out how to remove the VPN. To do this, just go to the section “ Change adapter settings» from the Control Panel. Next, right-click on the unnecessary element and select “ Delete».
Setting up a Windows XP connection
The connection setup process is almost the same as in Windows 7.


Now the connection can be made through the networks menu. You just need to enter the user and password to log in.

Creating a VPN Server
This instruction is valid for versions from XP and higher. Unfortunately, the standard virtual private network tool can only connect one user per session.

If you do not create a permanent IP or domain name, then to connect a user you will have to change the server address each time.
This completes the creation of the server; now you can connect one user to it. To log in, use the login and password from the previously created account.
VPN server on Windows XP
These instructions are relevant for setting up Windows 7, 8 and 10. In XP, the settings wizard is used for settings.

In the future, user and IPv4 protocol settings are made as on other versions of Windows.
Setting up a connection via Windows 8 and 10
VPN connection on Windows 8 has become easier to use and is done through a small program. It is located in the section " Net» - « Connections» - « VPN».

A VPN connection on Windows 10 and 8 can be configured not only through “ Control Panel", but also through the built-in program. In it you need to specify the connection name, server address and login information.

After entering the data, the network can be started from the connections menu. At this point, the question of how to create a VPN connection can be considered resolved.

How to create a VPN server, errors
If the user has any problems connecting to the VPN, this is indicated by a pop-up window with the number and description of the problem.
809
It is the most common and occurs when connecting via a MikkroTik gateway with the L2TP protocol.
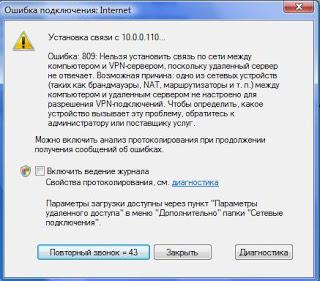
To fix it, you need to perform 3 configuration steps:

If after these settings error 809 is not resolved, then you need to change the registry. To do this, use the Win + R key combination and enter regedit Next, go to the section HKEY_LOCAL_MACHINE\System\CurrentControlSet\Services\Rasman\Parameters. Next, create a DWORD value named ProhibitIpSec with a value of 1.

After this, restart your PC.
806
After setting up a VPN Windows 8 may appear error 806. It occurs when the network setup or network cable connection is incorrect.

Let's look at solving these problems:
- Go to settings to change adapter settings.
- Next, create a new incoming connection and add a user with an Internet connection to it.
- In the connection properties, you need to select protocol version 4.
- Now you need to go to the additional settings of the TCP/IPv4 protocol and uncheck the “ Use default gateway on remote network».
- Now you need to set your firewall to allow incoming connections on TCP port 1723 with GRE protocol enabled.
- You also need to set a permanent IP on the server and configure data transfer to port 1723.
Thus, the remote server will transmit all data through this port and the connection will not be broken.
619
On Windows 7 it occurs when the security of the VPN connection is incorrectly configured.

In most cases, it occurs when the user name and password are entered incorrectly, but it can also appear when the connection is blocked by a firewall or when the access point is incorrect. If all entered data is correct, then the error is due to incorrect security settings. They need to be reset:
- In the VPN connection properties, go to the security tab and use the recommended settings.
- You also need to assign the item “ Data encryption required (otherwise disconnect)" After this, you need to save the changes and turn off the computer to restart.
A VPN connection allows you to reliably protect all transmitted data. Thanks to additional encryption protocols, unwanted parties will not be able to view information sent between users and servers. The main thing is to correctly configure the connection to the server.
Video on the topic
In this article we will look at how you can organize your own VPN server on Windows 7 without using third-party software
Let me remind you that VPN (Virtual Private Network) is a technology used to access secure networks over the public Internet. VPN allows you to protect information and data transmitted over a public network by encrypting it. Thus, an attacker will not be able to gain access to data transmitted within the VPN session, even if he gains access to packets transmitted over the network. To decrypt traffic, he needs to have a special key, or try to decrypt the session using brute force. In addition, this is a cheap solution for building an enterprise network over WAN channels, without the need to rent a dedicated expensive communication channel.
Why might you need to organize a VPN server on Windows 7? The most common option is the need to organize remote access to a computer with Windows 7 at home or in a small office (SOHO) when you are, for example, on a business trip, visiting, or generally not at your workplace.
It is worth noting that the VPN server on Windows 7 has a number of features and limitations:
- You must clearly understand and accept all potential risks associated with a VPN connection
- Only one user connection is possible at a time, and it is not legally possible to organize simultaneous VPN access to a computer with Win 7 for several users at once.
- VPN access can only be granted to local user accounts and Active Directory integration is not possible
- To set up a VPN server on a machine with Win 7, you must have administrator rights
- If you connect to the Internet through a router, you need to have access to it, and you need to be able to configure port forward rules to allow incoming VPN connections (the actual setup procedure may vary significantly depending on the router model)
This step-by-step instructions will help you organize your own VPN server on Windows 7, without using third-party products and expensive corporate solutions.
Open the panel NetworkConnections(Network connections) by typing “network connection” in the search bar of the start menu and selecting “View network connections”.

Then hold down the button Alt, click on menu File and select the item New Incoming Connection (New incoming connection), which will launch the Create Computer Connection Wizard.

In the wizard window that appears, specify the user who will be allowed to connect to this Windows 7 computer via VPN.

Then specify the user’s connection type (via the Internet or via a modem), in this case select “Thought the Internet”.

Next, specify the types of network protocols that will be used to service the incoming VPN connection. At least TCP/IPv4 must be selected.

Click the Properties button and specify the IP address that will be assigned to the connecting computer (the available range can be set manually, or you can specify that the IP address will be issued by the DHCP server).
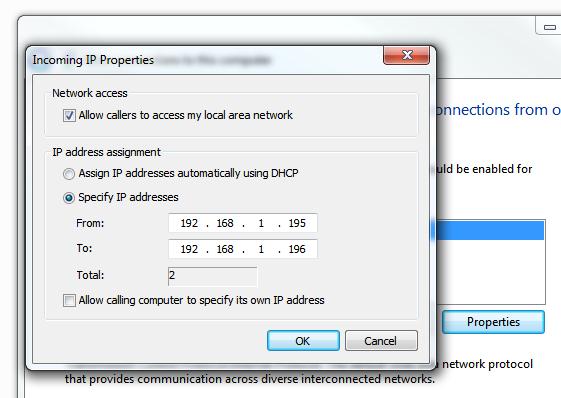
After you press the button Allowaccess, Windows 7 will automatically configure the VPN server and a window will appear with the name of the computer that will need to be used to connect.

That's it, the VPN server is configured, and a new connection named Incoming connections will appear in the network connections window.

There are a few more nuances when organizing a home VPN server on Windows 7.
Setting up firewalls
There may be firewalls between your Windows 7 computer and the Internet, and in order for them to pass the incoming VPN connection, you will have to configure them. Setting up various devices is very specific and cannot be described in one article, but the main thing to understand is that you need to open the PPTP VPN port number 1723 and configure forward (forwarding) connections to a machine with Windows 7 on which the VPN server is installed.
Don't forget to check your built-in Windows firewall settings. Open the Advanced Settings control panel in Windows Firewall, go to the Inbound Rules section and check that the “Routing and Remote Access (PPTP-In)” rule is enabled. This rule allows accepting incoming connections on port 1723

Port forwarding
Below I have posted a screenshot showing the organization of port forwarding on my NetGear router. The figure shows that all external connections on port 1723 are redirected to the Windows 7 machine (whose address is static).

Setting up a VPN connection
To connect to a VPN server with Windows 7, you need to configure a VPN connection on the connecting client machine
To do this, set the following parameters for the new VPN connection:
- Right-click on the VPN connection and select Properties .
- On the tab Security in field TypeofVPN(VPN type) select option Point to Point Tunneling Protocol (PPTP) and in the section Data encryption select Maximum strength encryption (disconnect if server declines) .
- Click OK to save the settings

We have a file server with the Windows Server 2008 R2 operating system installed in office No. 1.
2 personal computers with the Windows 7 Professional operating system installed in office No. 2. We described the installation of Windows 7 on these machines in one of the previous articles.
Office No. 1 has an Asus RT-N16 router.
Office No. 2 has an Asus RT-N10 router.
It is necessary to provide access from 2 personal computers from office No. 2 to the resources of the file server in office No. 1; for this, it was decided to install and configure a VPN PPTP server based on Windows Server 2008 R2.
To connect the server and computers located in different offices, the system administrator needs to perform a number of actions.
Let's start with "Server Manager" - "Roles" - "Add Roles" - "Next".
Select "Network and Access Policy Services".

Select "Routing and Remote Access Services" - then install it.

Go to "Server Manager" - "Roles" - "Routing and Remote Access".

"Right click" - run "Configure and enable routing and remote access." Select "Special configuration".

Check the box for “Virtual private network (VPN) access.”

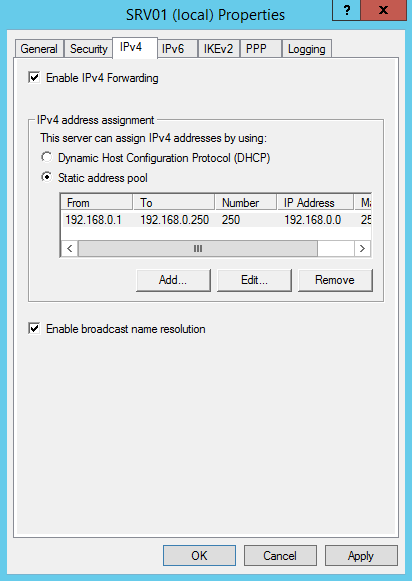
Right click on "Routing and Remote Access" - "Properties". IN "IPv4" tab - enable IPv4 forwarding and select a static address pool - here we select the pool of addresses that will be issued to connecting clients, it is better to make the subnet different from the one used.

The server is automatically assigned an IP address from this range. Using the ipconfig /all command we see that the server has received the first address from the specified range (192.168.5.10).

We go to the properties of the users to whom we need to give access to the server (if the users have not yet been created, then they need to be created) and select the “Incoming calls” tab, “Allow access” should be checked in the network access rights.

In the server firewall, you need to open a connection using the TCP protocol, port 1723.

We carry out router setup office number 1. In the “Internet” - “Port Forwarding” section, we write a rule according to which packets arriving on the external interface on tcp port 1723 are redirected accordingly to the server’s IP address (not the one that was issued above via DHCP).
In office No. 2, on each of the computers that need to be connected, we perform “Setting up a new connection or network.”

"Connecting to the workplace."

"Use my Internet connection (VPN)."

In the Internet address field, enter the IP of office No. 1 - “Next”

We write the name of the user to whom we previously granted access, and his password - “Connect”.

We need to go to the properties of the created VPN connection and on the “Network” tab, select “Internet Protocol version 4” - “Properties”.

"Advanced" - uncheck "Use the default gateway on the remote network."

We make the connection.
That's it, setting up computers for VPN PPTP connection is complete. Successful work.
This article is a ″Quick guide″ for setting up a Windows-based VPN server. All the actions described in the article were performed on Windows Server 2012 R2, but the instructions are suitable for any more or less current (at the moment) Windows server operating system, starting with Windows Server 2008 R2 and ending with Windows Server 2016.
So, let's begin. The first thing we need to do is install the remote access role. To do this, in the Server Manager snap-in, launch the Add Roles Wizard and select the “Remote Access” role with all the additional features.
And then in the list of services for this role, select “DirectAccess and VPN (RAS)”.

In addition to the remote access role and management tools, an IIS web server and an internal Windows database will be additionally installed. The full list of components to be installed can be viewed in the final window of the wizard, before confirming the installation.

The same thing, only much faster, can be done using PowerShell. To do this, open the console and run the command:
Install-WindowsFeature -Name Direct-Access-VPN -IncludeAllSubFeature -IncludeManagementTools

After installing the role, we will need to enable and configure the service using the “Routing and Remote Access” snap-in. To open it, click Win+R and enter the command rrasmgmt.msc.

In the snap-in, select the server name, right-click and select “Configure and Enable Routing and Remote Access” in the menu that opens.

In the configuration wizard window, select the “Custom configuration” item.

And check the “VPN access” service.

To complete the setup, start the remote access service.

The VPN service is installed and enabled, now we need to configure it in the way we need. Open the menu again and select “Properties”.

Go to the IPv4 tab. If you do not have a DHCP server on your network, then here you need to set the range of IP addresses that clients will receive when connecting to the server.
Additionally, on the “Security” tab, you can configure security settings - select an authentication type, set a preshared key for L2TP, or select a certificate for SSTP.

And a couple more points without which a VPN connection cannot take place.
First, you need to select users who have permission to connect to this server. For a stand-alone server, configuration is done locally, in the Computer Management snap-in. To launch the snap-in, you need to run the command compmgmt.msc, then go to the “Local Users and Groups” section. Then you need to select the user, open its properties and on the “Dial-In” tab, check the “Allow access” item. If the computer is a member of an Active Directory domain, then the same settings can be made from the “Active Directory Users and Computers” console.

And secondly, you need to check whether the necessary ports are open on the firewall. Theoretically, when adding a role, the corresponding rules are turned on automatically, but it won’t hurt to check again.

That's all. Now the VPN server is configured and you can connect to it.