Create a Recovery HD partition manually. How to make a hidden partition on a laptop (computer) for Windows recovery Creating a recovery partition
Custom or modified recovery is used by users to install certain applications and obtain Root rights. Also, one of the main purposes of using third-party recovery is to update the firmware of a smartphone or tablet. The most popular version now is TWRP recovery, which is used on most devices. This instruction will teach you how to create TWRP for your device with a Mediatek processor.
.
.


Manufacturers of laptops (netbooks) make an image of a disk (partition) with the operating system and place this image in a hidden partition. To restore Windows along with drivers and programs at the time of purchasing the laptop, you need to press a certain key or key combination before loading Windows. After pressing the appropriate keys, the recovery process will start. This is very convenient since the recovery process takes a minimum of time than if you installed Windows from an installation disk or flash drive. When restoring, in addition to Windows, drivers, utilities, and programs will be restored at the time of purchase of the laptop.
Despite all the convenience of restoring from a hidden factory partition, this method has disadvantages, such as:
1. during recovery, unnecessary programs will be restored that will have to be deleted.
2. When restoring, outdated drivers will be restored and will have to be updated.
3. You will have to download and install Windows updates again.
4. if you installed Windows from an installation disk or flash drive, and then want to restore Windows from a hidden partition, you will need to find, download, install the original MBR (master boot record). Otherwise the recovery process will not work
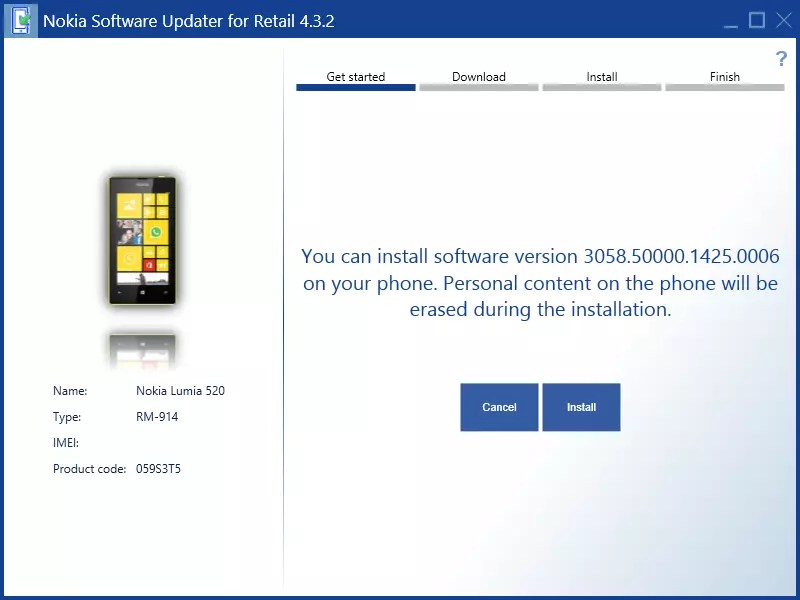
So what is the alternative to restoring Windows along with programs, drivers, etc.? There is an alternative and it lies in the fact that you need to create a hidden partition for recovery yourself and you yourself will form the contents of this partition. And the program will help us with this Acronis True Image Home
I'll give an example of creating using Acronis True Image Home 2009
Creating a hidden section.
We launch the Acronis True Image 2009 program. When you launch it for the first time, this window will appear. Click Cancel.

Click on the Service menu. Select Acronis Secure Zone.

In this window we set tick opposite the disk from which we will take away space for the hidden partition. The hidden section will be called Acronis Secure Zone. I took away space from drive D. Press the button Further.

Here, using the slider, we indicate what is the amount of disk space will occupy a hidden section.
For Windows XP (7Gb is enough) Windows 7 (20Gb is enough) You can immediately mark the item Activate. After that, click on the Summary data button.
Note: paragraph Activate Enables startup recovery. This means that if you need restore Windows, then you can use recovery via F11.Before loading Windows, when the corresponding prompt appears, you will need to press the F11 key.


Click Get started.

Process in progress creating a hidden partition to restore Windows.
AOMEI OneKey Recovery is an easy-to-use program for creating a partition on your computer's system drive to restore the system to a user-created backup. You can restore the system from the created partition by simply launching the program from the system boot menu.

The program user can create a new recovery partition (to do this, you need to prepare about 10 GB of free space on the system disk) or use an existing partition to store the system image. If desired, the created image can always be updated, for example, after a system update.


You can start recovery from the program itself, from the system boot menu, or by pressing the “A” button when starting the computer. System recovery is reduced to a few mouse clicks, which is very convenient, especially for less experienced Windows users.


OneKey Recovery will be useful primarily to those users who accidentally or intentionally deleted the system recovery partition prepared by the computer manufacturer, or who assembled the computer themselves and did not create it at all.


OneKey Recovery is distributed free of charge, the interface language is English. Windows 8 and Windows 8.1 are supported, as well as previous versions of the operating system. We tested the program in the Windows Technical Preview environment and did not encounter any problems during testing.
Every smartphone user has heard at least once the concept of recovery , let's figure it out What is this , in what cases you should use the mode and how to launch it on your device.
Contents:
Definition
Recovery (recovery mode)- This is factory software that is included in mobile and desktop operating systems. The purpose of the work is to back up data, configure system parameters of the phone/computer.
By logging into Recovery you can:
- Recover device errors;
- Flash your smartphone or reinstall the OS on your computer;
- Get superuser rights.
Let's take a closer look at how it works in all popular operating systems for smartphones and computers.
Recovery in Android

How to manage menus in Android?
After the recovery window has been successfully launched, the user must continue working with it, selecting the necessary actions.
Please note that the window does not have any auxiliary keys and you will not be able to move between its tabs using regular touches.
To control the system menu, use the side buttons of the phone and the Home key. Move up and down or left and right using the volume keys.
Confirming your selection is by pressing the Home button.

To exit recovery, click on “Power”. Remember, never disable the system menu until the process is completed.
This can seriously damage your device (cancel firmware update and data recovery).
Start the phone after disconnecting or use the reboot keys in the system menu itself.
If the volume keys do not work on your gadget, you can connect a regular mouse to the device using a cableOTG and easy to operate system menu.
Explanation of mode names
Depending on the device manufacturer, the design and placement of tabs may differ, but the set of functions and control principles remain the same.
In 99% of cases, the recovery menu is displayed in English.
In order not to be mistaken in choosing the right item and to configure your phone correctly, First read the explanation of each option:
Mounts with Storage – This is a tab for memory management. With its help, you can format disk space partitions or view the usage of internal and additional memory;
Reboot system – forced reboot of the device at the moment. In practice, this function allows you to quickly rid your smartphone of most software problems without the need to reset to system settings. After a reboot, all user files and applications are saved;
Install from SD – launching the installation mode of the archive with firmware, which is stored on the memory card. If you want to flash your smartphone manually, you should first download the ZIP archive from Android for your device onto the card and then use Recovery to start the OS reinstallation process;
Wipe Cache Partition – clearing the device cache memory. Please note that this function works much more efficiently than any third-party program for clearing cache and temporary files;
Factory Reset (or Wipe Data ) – return the gadget to factory settings. As a result, you will receive a smartphone with the firmware version that was installed by the manufacturer. All user files and programs will be deleted. The settings are also not saved. Before performing this process, we recommend that you create a backup copy of your data and upload it to the cloud;
Backup or Restore – launch a device data backup mode or select a copy to restore user files and settings.
Stock and Custom Recovery. What is the difference?

Wait until your smartphone is recognized in the installed program and click on the “Other download” tab.
In the “SDK Tool” field, check all the proposed options and save the changes. Wait for all packages to be installed and close the program.
Now you can proceed to installing custom Recovery.

To install a third-party TWRP recovery menu, you will need a downloaded archive with a custom version.
Don't forget to select your device model and manufacturer.
Save the resulting archive in the memory of your PC - any directory and system drive. Follow the instructions:
2 Install and run the Android SDK utility on your PC;
3 On your smartphone, enable quick component installation mode. To do this, press the Volume Down and Power buttons simultaneously until the robot icon appears;
Phone to computer connection field follow these steps:
- Open the folder with the downloaded custom Recovery firmware. It must be in IMG format. Click on an empty space inside the firmware folder while holding down the Shift key. An item will appear in the drop-down list "Open in command window". Click on it:

- In the command prompt window that appears, enter the command "FASTBOOT FLASH RECOVERY FIRMWARE_NAME.IMG" and press Enter. Please note that FIRMWARE_NAME.IMG is the unique name of the file with the custom Recovery image, which is located in an open folder on the computer.

The installation result will be displayed.
After installation, try launching a new Recovery. To do this, use a unique keyboard shortcut for your smartphone or tablet.
Detailed instructions for launching the recovery menu are described at the beginning of the article.
After the first launch, you need to select the interface language and the design theme you like. Unlock the screen by flicking to the right to allow changes. Continue to use the updated version with a convenient Russified menu for updating the OS, resetting to factory settings or managing memory.

Recovery on Windows Phone
Unlike, platform users do not have such a large number of recovery menu options.
Also, there is no possibility of installing third-party menu options.
However, you can still easily resolve OS problems and resume normal operation of your smartphone or tablet.
There is no need to use complex key combinations to log into Windows Phone. Just download the special utility to your computer and install it.
Connect the gadget to your computer and open the recovery program. Wait until the utility recognizes your smartphone.
Then run troubleshooting and repair mode or install a new version of the OS. Information about current firmware is displayed in the main program window.
Also, users can view the battery status and check for errors. Using the troubleshooting window, you can run automatic troubleshooting for your OS.
Recovery in Windows 10
Recovery mode is also available in desktop Windows 10.
With this system utility you can quickly fix errors, bugs, and updates.
The menu is designed to minimize user interaction.
The computer performs diagnostics automatically and corrects problems on its own, up to and including instantaneous certificates.
How to launch Recovery in Windows 8/10?
To start the mode "Diagnostics and Recovery" in Windows 10, follow the instructions:
1 Open Notification Center by clicking on the corresponding key in the lower right corner of the screen;
2 Select a tile "Options";

3 You will be taken to a window for viewing and configuring OS settings. Click on the item "Update and Security";
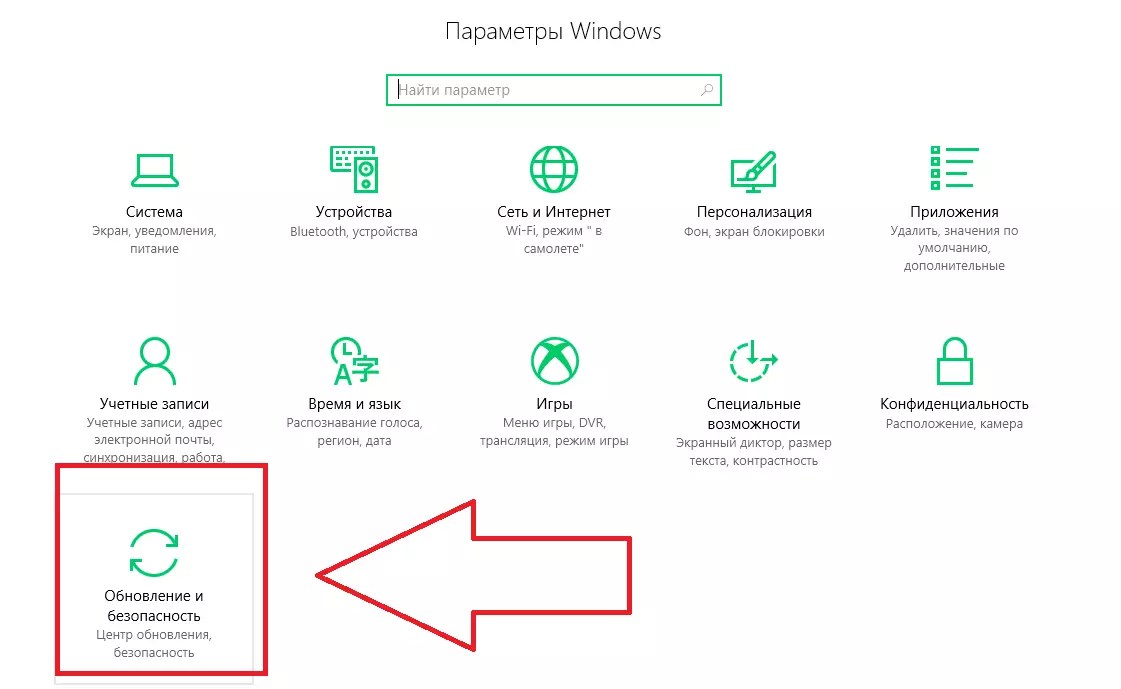
4 In the window that appears, select the tab "Recovery"(on the left side of the screen). At the same time, a window of available settings will appear on the right. Click on the button "Begin" to launch it.
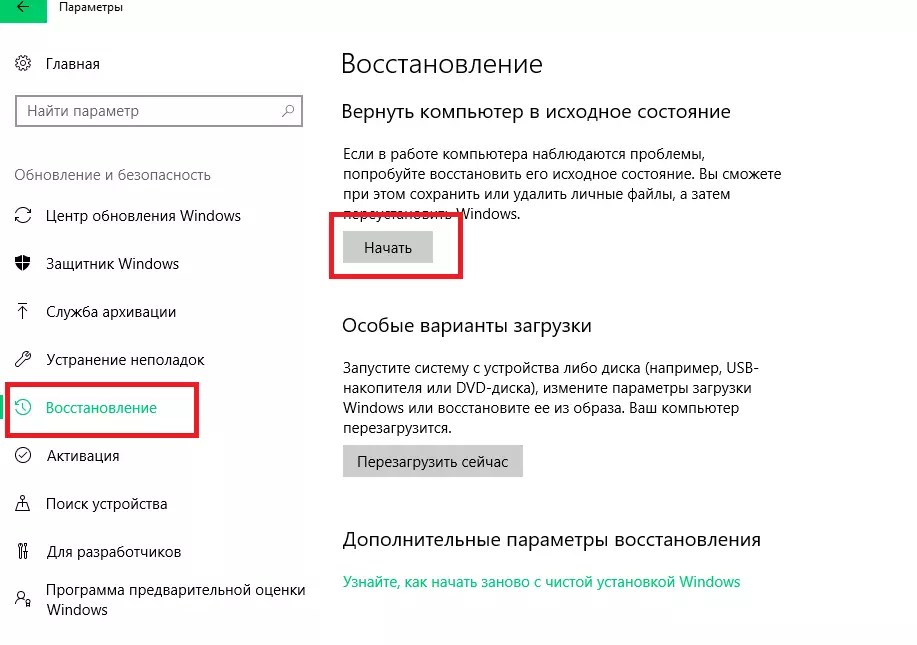
After a few seconds, the system will log out of the user account and you will be taken to the Recovery window:

In the system menu, Windows 10 owners can:
- Restore system . By clicking on this tab, you launch a utility that automatically scans the entire OS and its interaction with PC hardware components. If problems are detected, they will be fixed without user intervention;
- OS image recovery . This option allows you to reset the settings of your installed Windows using an existing copy of the image. The image can be run on either disk; Windows . The mode will begin to reboot the OS, correcting all the problems that prevent it from turning on;
- Command line . Through Recovery, users can work with the command line, performing their own steps to troubleshoot OS problems;
- Built-in options UEFI – this option implies setting up the factory software (). It is recommended to use this function only for those who really understand the intricacies;
- Reverting to an older build version . This tile in the window allows you to roll back to the old generation of Windows OS or to the previous update package.
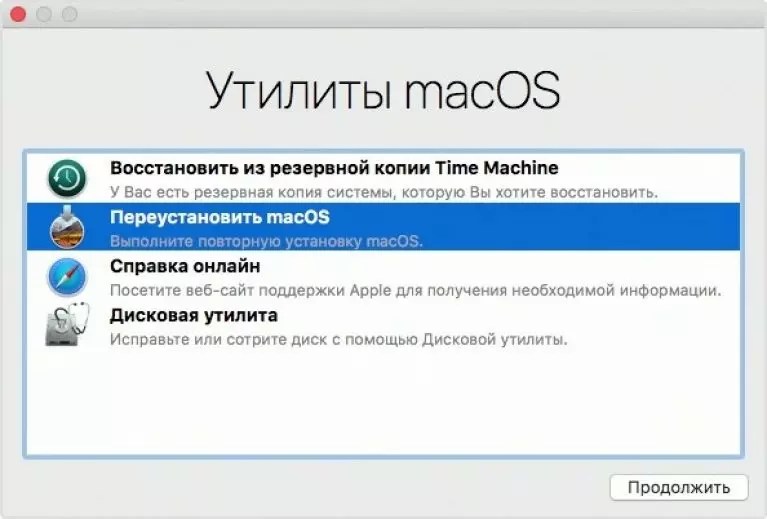
Recovery on Mac OS
On Mac OS is a system utility with which users install a new version of the operating system from the Apple server. Also, this mode allows you to restore a backup copy of all files using Time Machine.
To launch Recovery, press the Command + R keys simultaneously and hold them there for 2-3 seconds.
The Utilities window will appear. In this window you need to select the item "Reinstall Mac OS" and confirm your choice.
- Working with backup files in Time Machine;
- Installing an update to your OS X;
- Reference– finding a suitable solution to your PC problems and contacting support;
- Disk Utility– a program for setting up work with the disk space of your OS. With its help, you can restore work from a boot disk or connect a new storage medium to your PC.
Remember, an Internet connection is required to download the new OS version.
Also, if your data is backed up, make sure that all your files are synchronized using the global network.
Thematic videos:
So, you have finished installing the operating system, drivers, updates and programs, checked its performance and stability, were satisfied with the result obtained and want to be able to “roll back” to this system state in case of unforeseen circumstances. Windows 7 is equipped with fairly powerful backup tools that can reduce the time it takes to restore the system. Those who have bought new computers with Windows 7 pre-installed are familiar with the restore function, after which the operating system, and sometimes the contents of the entire hard drive, is returned to its factory state. In this case, user files located on the hard drive may be lost.
If you have an installation disk with the operating system, you are spared from such losses (How to reinstall Windows 7, saving settings and installed programs), but subsequent installation of drivers and updates is inevitable. I offer you a method that will significantly reduce the time spent setting up the system after reinstallation; moreover, it does not require an installation disk. The article uses materials from Vadim Sterkin’s blog and a video report by Valery Volobuev Setting up the Windows Recovery Environment in Windows 7. The algorithm described below does not require specific knowledge and is relatively easy to implement for a home user. We will perform the task in the following order:
- prepare a partition for the future recovery partition;
- create a system image in the Windows RE environment;
- configure the recovery environment;
- Let's reinstall and reconfigure the recovery environment.
Preparing the recovery partition
First of all, we need to create a partition on which we will subsequently place the operating system image file, as well as the file for deploying the recovery environment. There are many ways to perform this operation, I will use standard tools: Disk Management and the command line utility DISKPART. You can read about this in the article “Disk Management in Windows Vista and Windows 7”. We will determine the partition size based on the current occupancy of the partition with the operating system and the availability of free space. For example, if the system takes up about 20 gigabytes, the optimal size would be from 5 to 10 gigabytes. In my example, the section D:\ was first compressedFigure 1 – compression of partition D:\
Then in the resulting unmarked area

Figure 2 – unallocated disk space after compression
Using the utility DISKPART a primary partition was created, formatted, and a label was assigned to it Recovery and letter R. (DISKPART was used due to the fact that using Disk Management, the fourth partition created will be an additional one. You can experiment with placing the recovery partition on an additional partition.) Run sequentially:
::Start DISKPART
Diskpart
Sel disk 0
::Creating a primary partition on the entire unallocated area of the disk. If necessary, specify the partition number using the LIST PART command
Create partition primary
::Quick formatting of the created partition and assigning the “Recovery” label to it
Format LABEL=”Recovery” quick
::Assigning the letter R to a section:
Assign letter=R
::Stopping DISKPART
Exit

Figure 3 – work in DISKPART
Here and in what follows, we will work in a command line launched with administrator rights. Before moving on to capturing an operating system image, create a R:\
folder WinRE for storing it.

Figure 4 – WinRE folder at the root of the future recovery partition.
Creating an operating system image
First of all, study the article “Creating a customized operating system image”. It describes the principles and tools, namely the utility imagex.exe, part of the Windows AIK. Depending on the bitness of the system, you must use the appropriate version of this utility. I have posted both versions of them on the section D:\ in folder WAIKTools.
Figure 5 – WAIK Tools folder on a non-system partition
I also strongly recommend Vadim Sterkin’s article for review and guidance: “How to quickly determine drive letters in the recovery environment or Windows PE.” This knowledge will help us not to make mistakes in the command syntax for capturing an operating system image. Restart your computer and enter the recovery environment (to do this, press F8 after turning on your computer and select "Troubleshoot your computer" from the advanced boot options menu).

After downloading, launch the command line and text editor: notepad Using the “Open” menu (Ctrl + O) determine the partition letters. In my example, as can be seen from Figure 7, the system section received the letter D:\
, utility imagex.exe is in the folder E:\WAIKTools\
, and the section Recovery– letter F:\
.

Figure 7 – partition letters in the WindowsRE environment
One note: since we will not need to transfer the customized image to another computer, we will use the command given in the “Boot to Windows PE and save the image using the ImageX utility” section of the above article.
Run the command:
"E:\WAIK Tools\amd64\imagex.exe" /capture D: F:\WinRE\install.wim "Windows 7 Ultimate SP1 Custom"
Necessary clarifications:
- "E:\WAIK Tools\amd64\imagex.exe" - Path to the imagex.exe utility. Quotes are used to avoid problems with spaces in the folder name.
- /capture D: - The key indicates the capture of the system image located on the D: partition (as seen in WindowsRE).
- F:\WinRE\install.wim "Windows 7 Ultimate SP1 Custom" - Saving the captured image to the install.wim file (this is important, since in this case only this name is valid) in the F:\WinRE folder. A file comment is specified, and the default compression method is used (compress maximum).

Figure 8 - creating an operating system image in the Windows RE environment
Quit WindowsRE and reboot. Let's move on to the final stage of creating a recovery partition.
Setting up the recovery environment.
In addition to the operating system image file, I decided to place a file on the new partition that would boot into the recovery environment. With this arrangement, it will not depend on the partition with the operating system. As you know, the recovery environment is deployed from an image file WinRE.wim located in the folder Recovery at the root of the system partition. Access to this folder is blocked through Windows Explorer. The file attribute is hidden system. How to place the file in the location we choose?Let's use command line utilities. First, disable the recovery environment. Please note that Any actions with the recovery environment must be preceded by disabling it! To do this, on the command line run
Reagentс /disable
After running this command the file WinRE.wim will move to the folder c:\Windows\System32\Recovery.
From it we will copy the file to the folder R:\WinRE.
Use the command xcopy with key /
h:
xcopy /h c:\Windows\System32\Recovery\winre.wim r:\WinRE

Figure 9 – copying the WinRE.wim file
And finally, a few final chords:
/
path
) to the system image file located in the folder specified by the key/
target
Reagentc /setosimage /path R:\WinRE /target c:\Windows
::Set custom path (key/
path
) to the system recovery environment deployment file located in the folder specified by the key/
target
Reagentc /setreimage /path R:\WinRE /target c:\Windows
::Enabling the recovery environment
Reagentc /enable
::Checking recovery environment settings
Reagentc/info
As can be seen from Figure 10, the setup was successful. Do not close the window - the command line will still be needed.

Figure 10 – setting up a custom recovery environment.
It will be interesting to see what changes have taken place in the section Recovery. To do this, enable the display of hidden and system files.

Figure 11 – changing the contents of the R section.
As you can see, the file WinRE.wim in folder WinRE no, but a folder appeared Recovery at the root of the section. Believe me, the file is now in it. I will not dwell on the structure of the Recovery folder - if you wish, you can study its contents, and also compare with the BCD parameters (using the command bcdedit /enum all). All that remains is to protect the section from accidental impact from users. To do this, you need to hide it from Explorer and exclude the ability to work with it in Disk Management. The utility will help us with this again Diskpart. On the command line, run sequentially (the disk and partition numbers correspond to the configuration given in the article):
::Start DISKPART
Diskpart
::Disk selection. If there are several of them, then the number of the required disk is determined by the LIST DISK command
Sel disk 0
::Selecting a section. If necessary, specify the partition number using the LIST PART command
Sel part 4
::Deleting a letter - the partition will be hidden in Windows Explorer
Remove
::Setting the section IDID=27.This ID is set specifically for recovery partitions. It becomes impossible to work with such a partition in Disk Management, which provides additional protection for it
Set id=27

Figure 12 - working with the recovery partition in DISKPART
Changes that have occurred in the system
Firstly, the partition is not visible in Windows Explorer, and it does not have a context menu in Disk Management.
Figure 13 – Explorer and Disk Management Manager.
Secondly, in the Advanced Recovery Methods window in the description of reinstalling Windows, there is no requirement to have an installation disk.

Figure 14 – Windows advanced recovery methods menu.
Thirdly, the recovery environment menu has changed:

Figure 15 – additional menu item in Windows recovery options in the recovery environment
This could have been the end of it. But there is a need to dwell on several nuances that arise after reinstalling the system in this manner. I will reinstall the system from the recovery environment.
Setting up a recovery environment after reinstalling the system
For the purity of the experiment, I will format the partition with the system and the partition with the download files. Moreover, I strongly recommend formatting the “System Reserved” section to avoid confusion with loading in the future.
Figure 16 – formatting partitions in the WindowsRE environment.
No user participation is required during the reinstallation process. You will receive a system identical to the one you had at the time you took the image.

Figure 17 – beginning of system reinstallation.
The only thing is that after reinstalling you need to make a few changes:
- Due to a complete rebuild of the BCD, the recovery environment must be reconfigured.
- hide section in explorer Recovery.
Reagentc /disable
Turn on display of hidden and system files, open the folder WinRE on the section R:\
and make sure the file exists Winre.wim. If necessary, copy it from the folder Windows\System32\Recovery or from a folder R:\Recovery\xxxxxxxx-xxxx-xxxx-xxxx-xxxxxxxxxxxx. After that delete the folder Recovery on the section R:\
.

Figure 18
Then enable the recovery environment: Reagentc /enable Make sure the settings are correct (note that the name of the folder where the WinRE.wim file is located in the Recovery folder is different. Therefore, before connecting the recovery environment, you can safely delete the old one.):
Reagentc/info

Figure 19 – connecting the recovery environment after reinstallation.
Remove the letter from the partition R:\
Diskpart
Sel disk 0
Sel part 4
Remove
Exit
Your computer is ready for a fresh reinstallation. One final note. While performing numerous reinstallations while preparing this article, I noticed the appearance of an incomprehensible folder in the list of available drives on the “System Protection” tab. This may be due to the missing folder in the system image SystemVolumeInformation or changing section IDs.

Figure 20 – phantom partition in the list of available disks on the “System Protection” tab.
To get rid of the strange folder, disable system protection on this phantom partition and enable it on the partition with the current system.